


Username
Password
Remember Me
Log in
Forgot your password?
Forgot your username?
Forgot your username?
Dynamic Product Options App for Shopify User Guide1. IntroductionThe document is a User Guide for app Dynamic Product Options created for Shopify websites. It describes the app functionality and provides some tips for a quick start. The purpose of the Dynamic Product Options app for Shopify is to allow creating complex option-based products. The app provides a simple and convenient way to configure and design custom options the way you need it. Product Options Editor The DPO editor is developed to simplify the process of creating custom options. You are able to add an unlimited number of sections and option. Various field types allow to customize product options appearance in different ways. You can reorder options, manage fields' and sections' visibility, apply a conditional logic. Product Options per Product Variant The app helps to create and manage custom options for product variants. You may have different custom options for different product variants. Field Types The plugin provides a number of various field types: Input Box, Textarea, File, Dropdown, Radio Buttons, Check Boxes, Multiple Select, Date, Image and DIV/HTML. Each field type has common and unique settings improving the editing process. The app also provides the functionality for text-, color-, image-, and rich-text swatches. Dependent Custom Options The enhanced conditional logic builder lets to make options dependent ({Hidden Option 2} depends on {Visible Option 1}) and allows to save space on the product view and show the relevant options only. You can apply an unlimited number of dependent fields as well as manage the visibility of all sections. Associated Custom Options The app embeds the associated options functionality allowing to create a bundle offer and associate custom options to existing products in your store with full inventory support. Product Options Templates and Mass Actions The product options templates functionality allows to add and manage options templates, update custom options within templates using the mass action tools. It helps to copy custom options and apply them to multiple products in bulk, replace or append options within templates. Advanced Options Pricing, SKUs, Weight and Setup Fees All custom options can have their own additional prices. You can set up tier prices to provide product options at lower prices for a bulk purchase. You are able to override, remove or add options prices, SKUs or weight to calculate and display necessary data on product pages, cart and order. You can also enable setup fees based on custom options to add a single charge one time only not depending on the quantity in cart. Images for Dropdown, Radio Buttons, Check Boxes and Multiple Select. Color Selector The app allows to upload custom images for options of the Dropdown, Radio Buttons, Check Boxes and Multiple Select types. Just pick a necessary image from your PC and apply it to the option. The app also has an ability to reload the base image with the chosen option. You can also add solid colors per option using the color selector. Text and Color Swatches, Tooltips The plugin enables text and color swatches per certain field types. You can create tooltips per each option using the WYSIWYG editor to show some hints or additional information with pictures. Advanced Design Editors The built-in CSS and JavaScript editors help to customize options' appearance to match your website's design. 2. How to Use2.1. SettingsThe app's settings can be found following Apps > Dynamic Product Options > Settings. General Settings 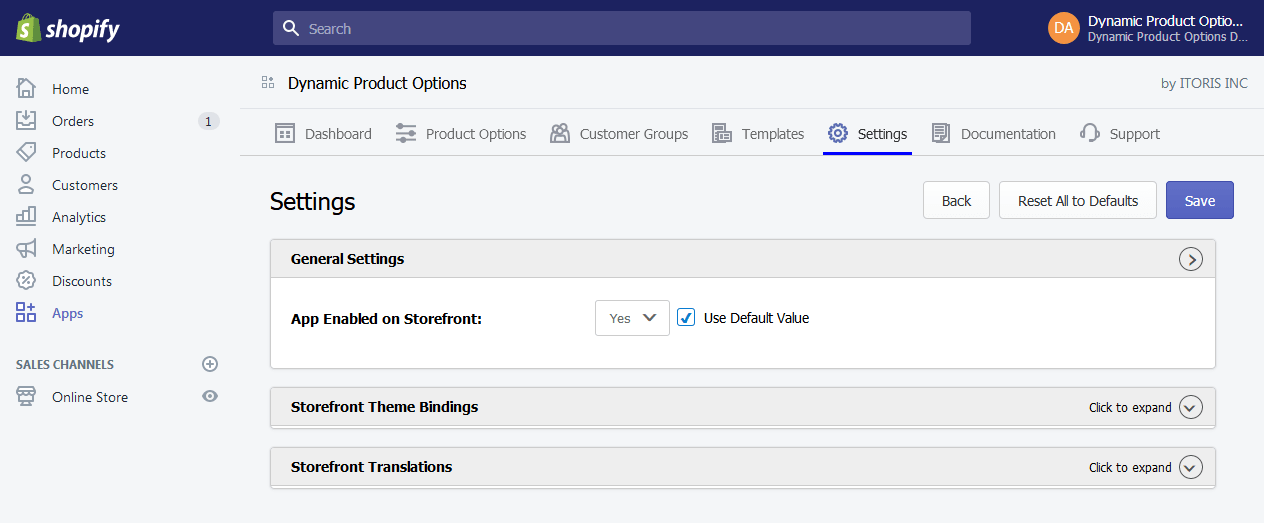
Storefront Theme Bindings 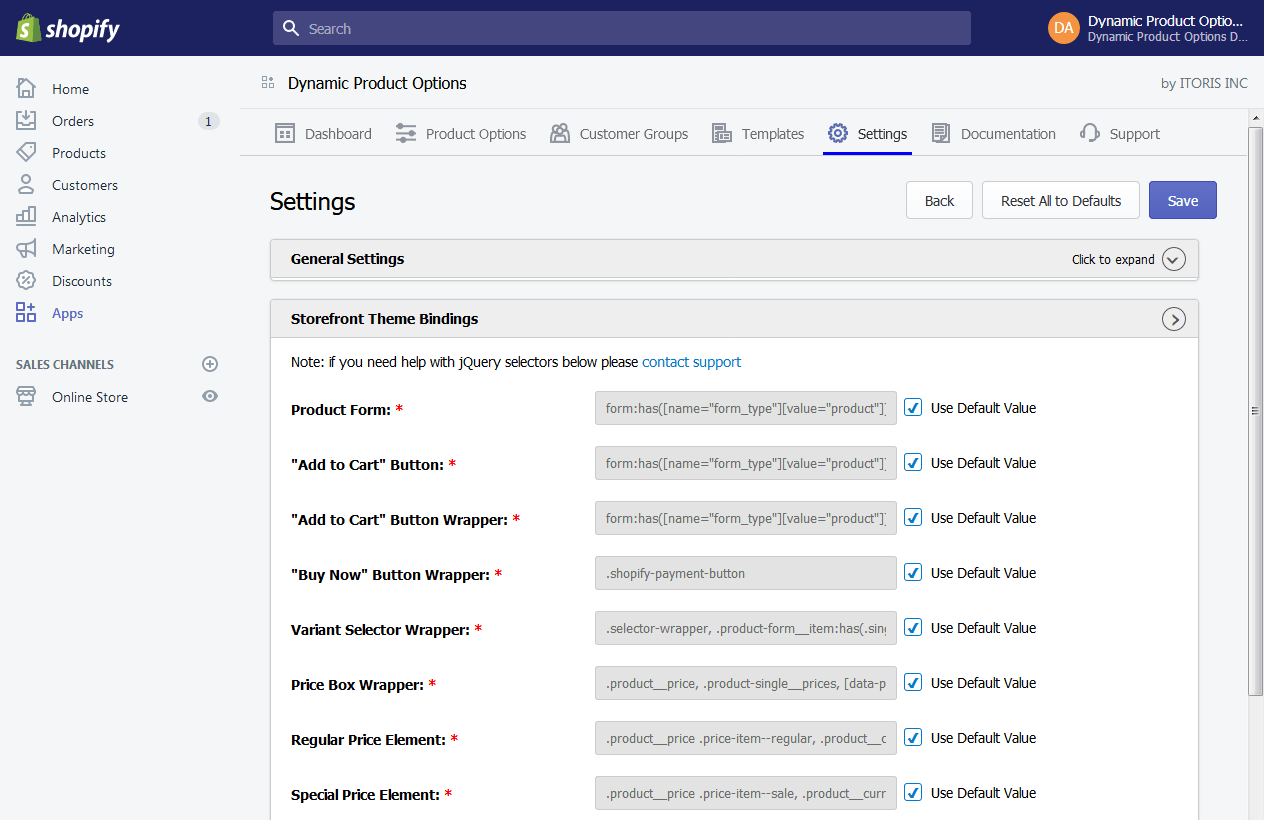 The section contans all jQuery selectors used on the Storefront to bind the app functionality into your theme. The default values were created based on a bunch of themes available for Shopify. However, if your theme uses some specific selectors you can modify them here. If you have no experience in jQuery/CSS please contact our support for assistance. We will help you adjust the values for your theme. Storefront Translations 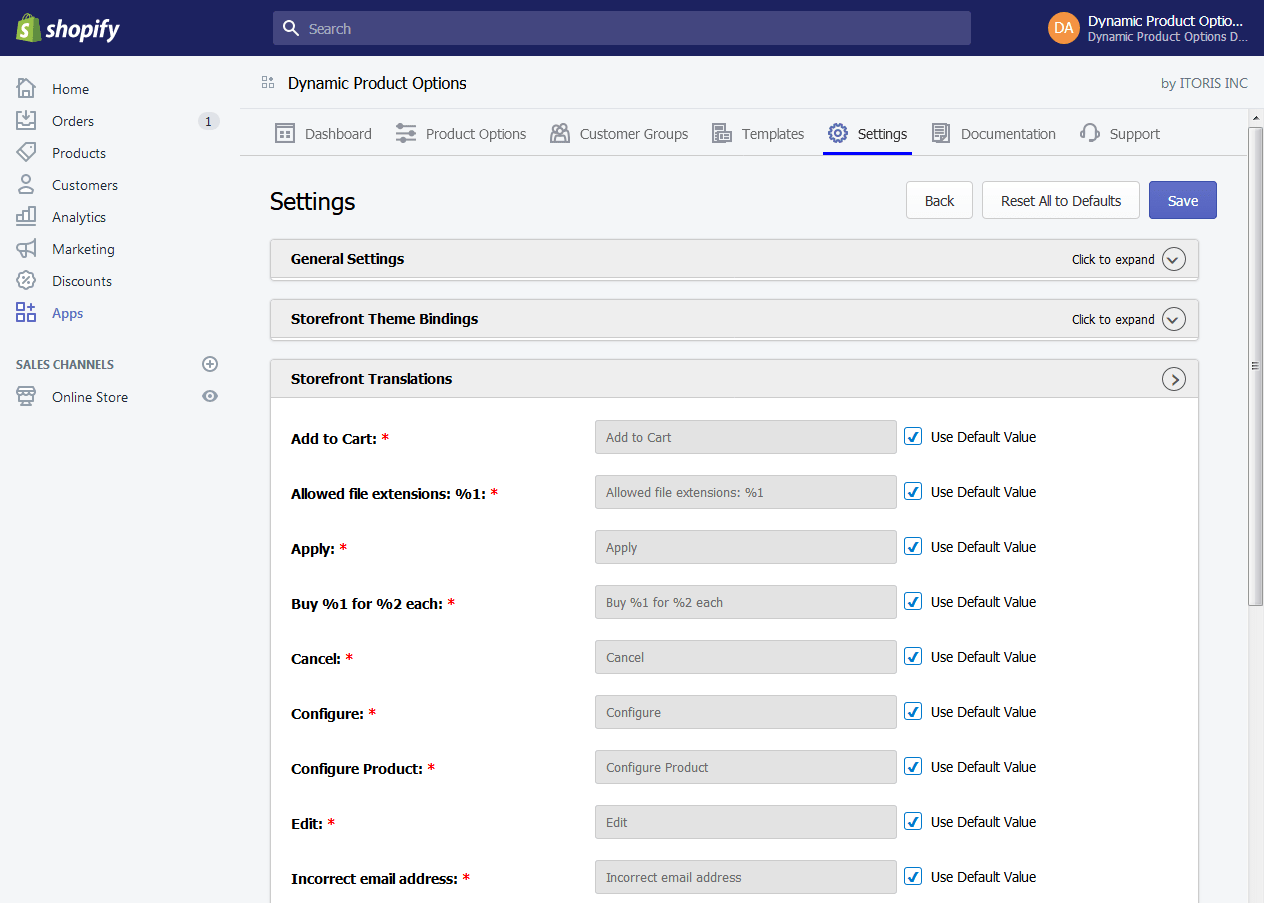 The section allows to modify texts visible to your customers on the Storefront of your site. If you are running a non-English site you can make all translations here. 2.2. List of ProductsThe filterable and sortable list of all products is available following Apps > Dynamic Product Options > Product Options. 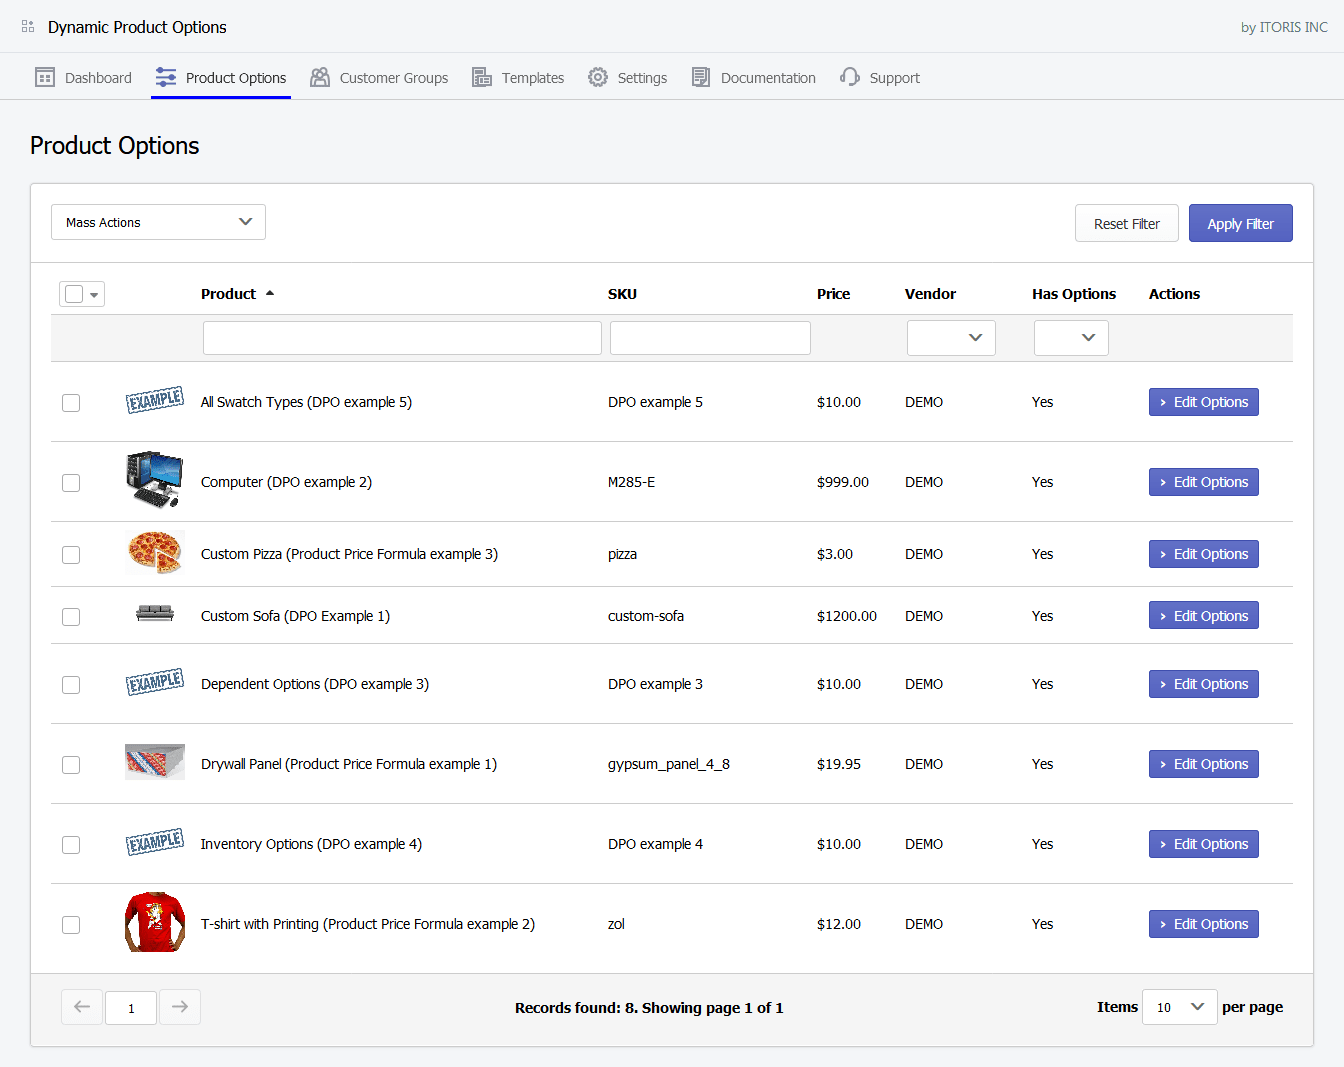 In column "Has Options" you can see which product already have custom options. Filter the table by column "Has Options" to see only product having custom options. To edit options click button "Edit Options" next to the product. 2.2.1. Mass ActionsThe app provides mass actions to apply the same action to multiple products at once. Select products on the grid and pick a necessary action in the "Mass Actions" dropdown. 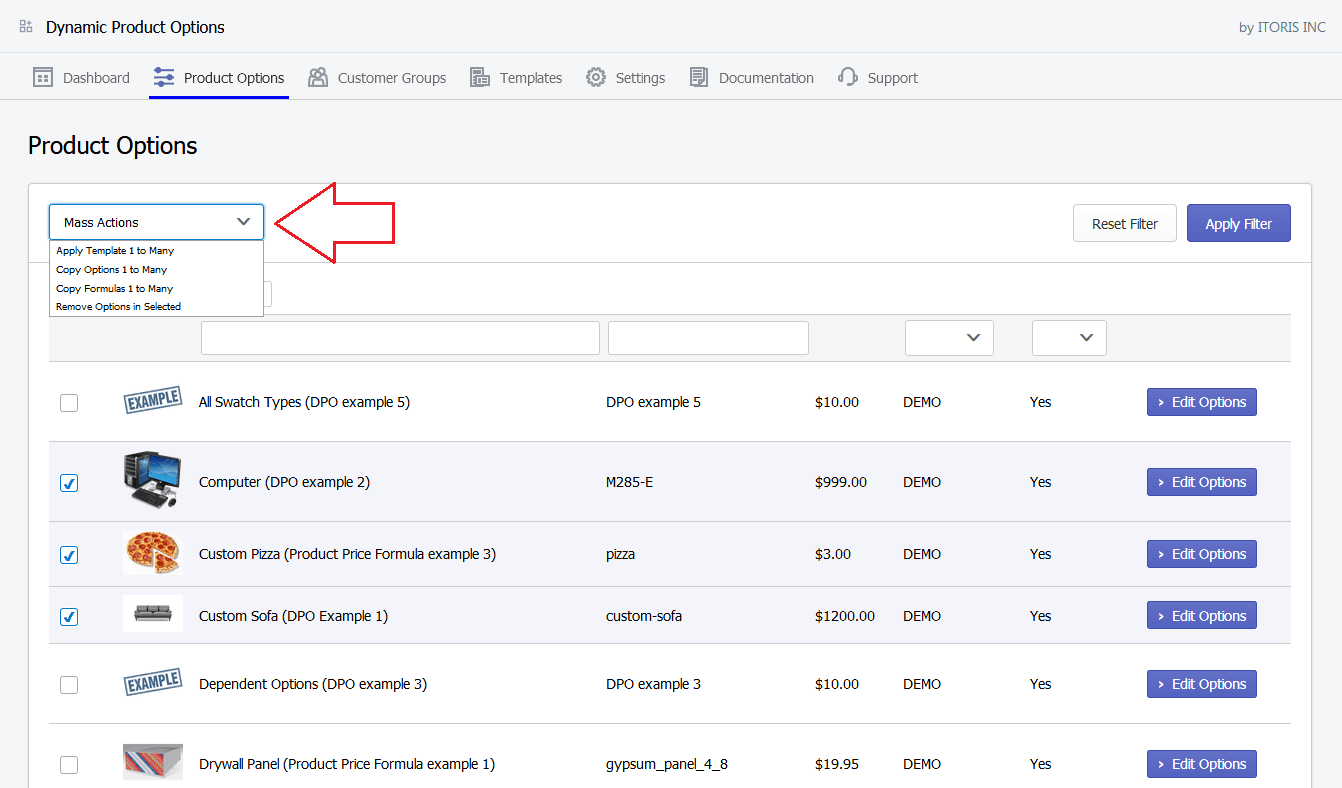 2.2.1.1. Apply Template 1 to ManyThe mass action allows to load custom options from an existing option template into multiple products in bulk.  In the appeared popup:
Replace options and leave them editable. The template replaces custom options in the selected products. The options remain editable in the products. Append options and leave them editable. Custom options from the template are added at the end of existing options in the products. The options remain editable. Using this method you can apply multiple templates to the same product at the same time. Replace options and associate to template. Like in the first method the custom options from the template are copied into the selected products. The options are associated to the template and can't be edited. Changes in the template are automatically applied to all associated products. This method is useful when the same template is associated to many products at the same time. You no longer need to update each product individually. Simply make changes in the template. Append options and associate to template. This method combines the first and the third methods. You can add multiple templates to the same product at the same time. Options are associated to the template and can't be changed within products. All changes are made through templates. 2.2.1.2. Copy Custom Options 1 to ManyThe "Copy Custom Options 1 to Many" action allows to copy custom options between products without using templates. Select products you need to apply options to, and choose action "Copy Custom Options 1 to Many".  In the appeared popup click button "Pick a Product" to select a product you want to copy options from. Use the filter to find a necessary product by name or SKU and click button "+ Select". 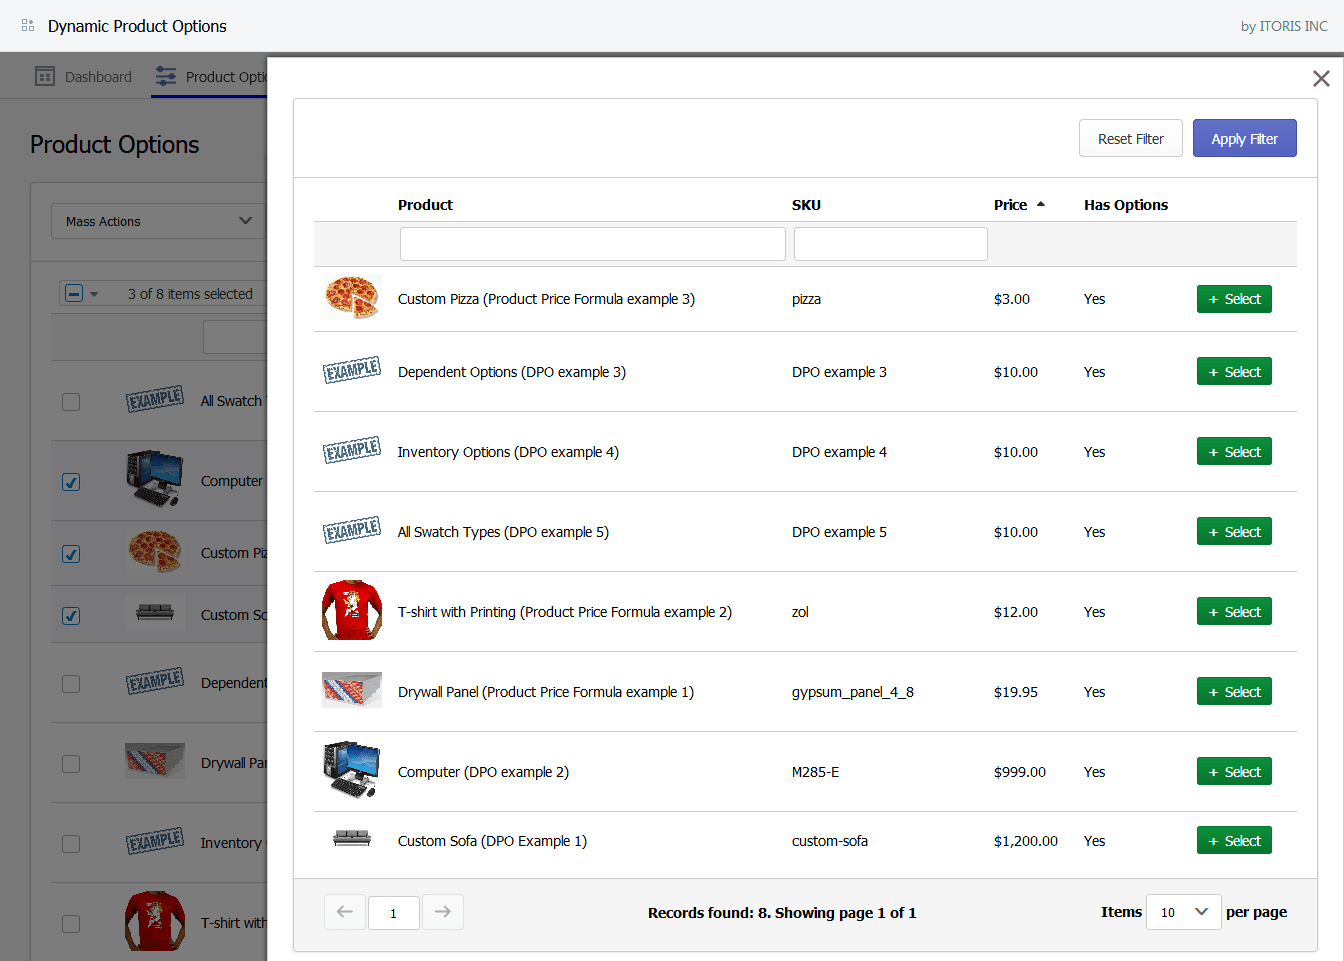 Keep in mind, the action copies both the custom options and the price formulas. 2.2.1.3. Copy Formulas 1 to ManyThe action copies only formulas between products. This action is useful when you need the same formulas with slightly different custom options in products. In appeared popup click button "Pick a Product" and select a product you want to copy price formulas from. 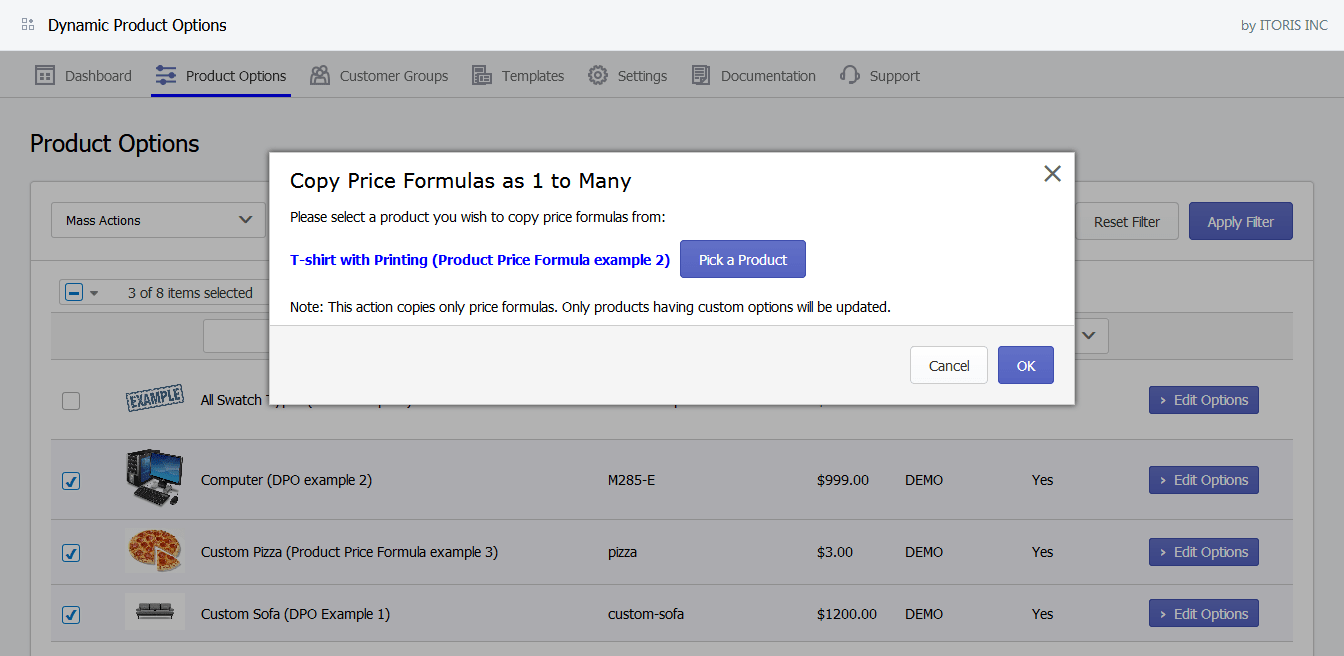 2.2.1.4. Remove Options in Selected productsThis mass action removes custom options and price formulas from selected products. 2.3. Product Options ConfigurationYou can edit custom options for each product following Apps > Product Options > {Edit Options} 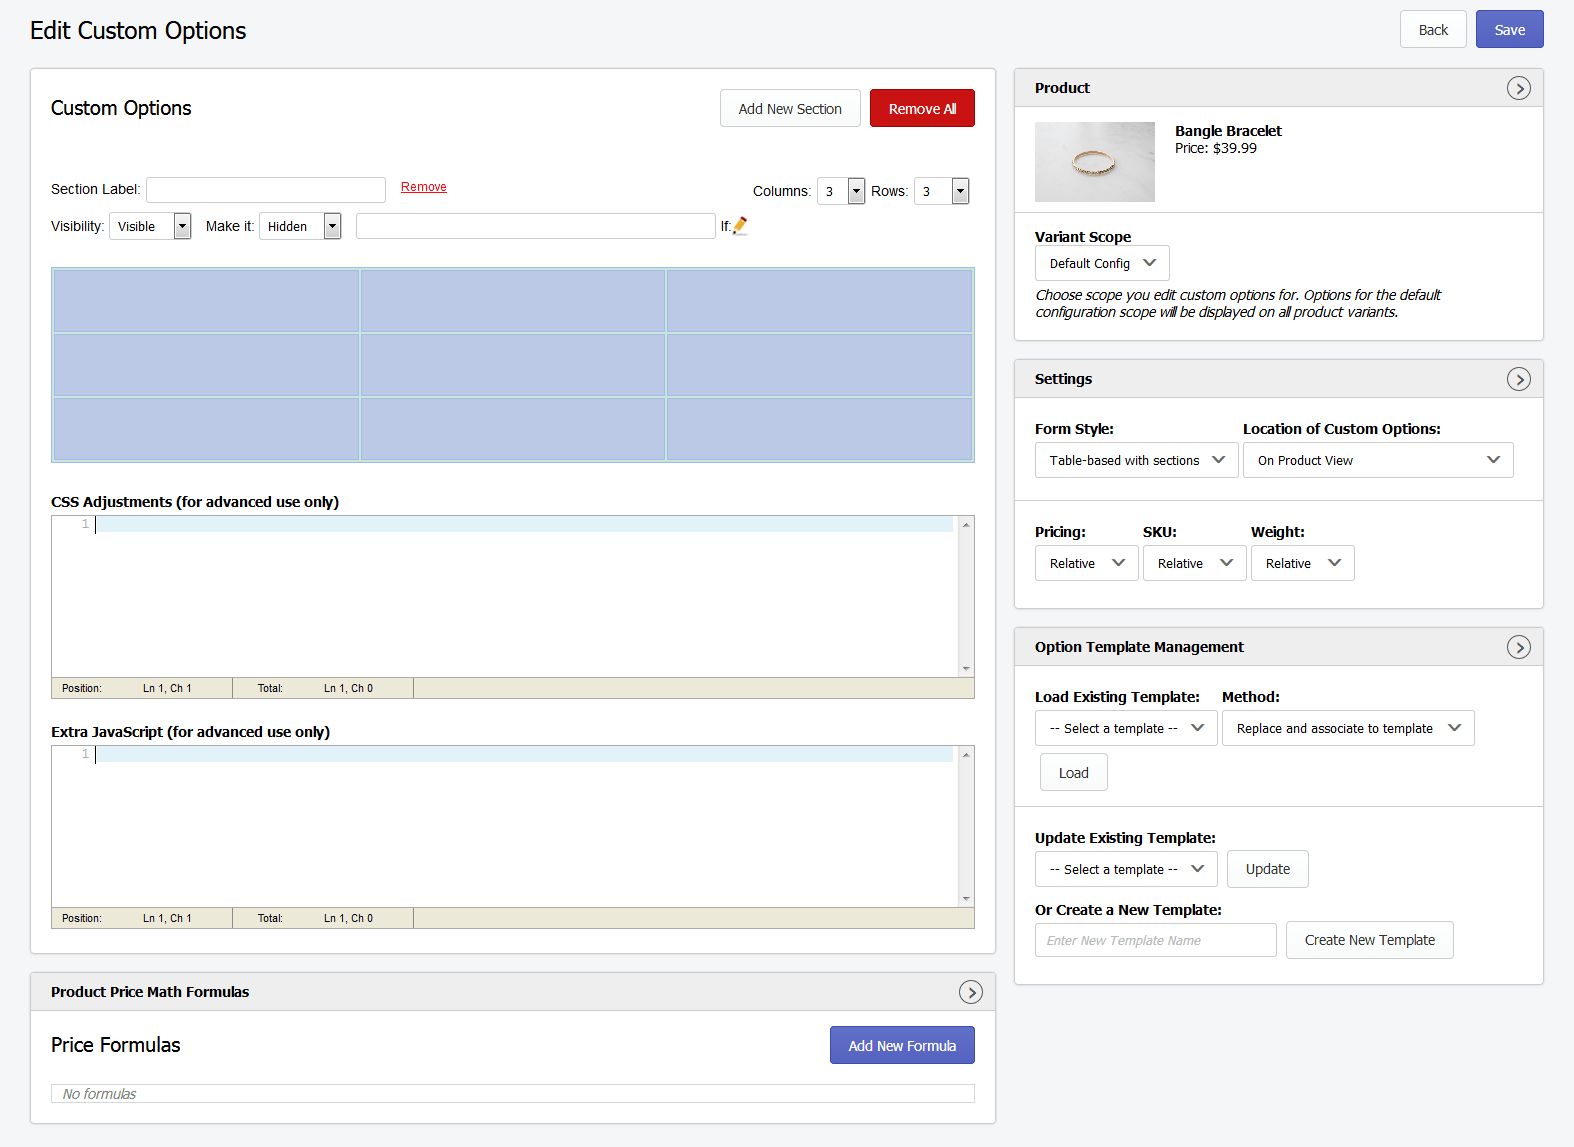 The page is divided into the following blocks:
2.3.1. Product Information and the variant scope switcherThe block displays the image, name and the price of product you currently edit options for. If the product has variants you may select them in the "Variant Scope" dropdown. By default, the "Default Config" value selected, which means the option configuration is applied to all variant of the product. If you want to override options for a specific variant select it in the dropdown. This way, you can configure options for each variant individually. 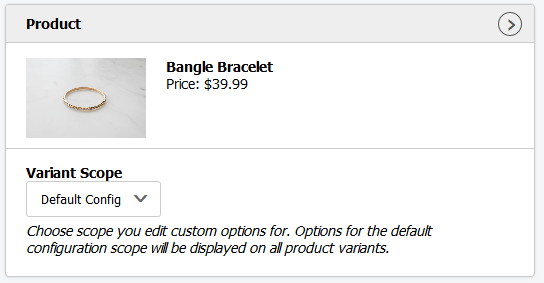 2.3.2. Form SettingsIn this block you can select the form style and appearance, and set the price, SKU, and the shipping weight policies. 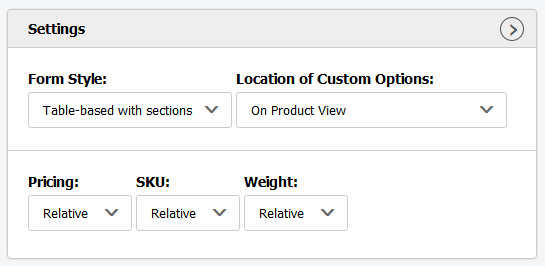 2.3.2.1. Form style and the appearanceThe following Form Styles are available:
The app provides the following form appearances:
2.3.2.2. Relative Price, Absolute Price, Fixed PriceThe following price policies are available:
2.3.2.3. Relative SKU, Absolute SKU, Fixed SKUThe final SKU is displayed in the order and can be generated in the following three ways: Relative SKU. The product SKU and SKUs of all selected custom options are combined. The final SKU will look like it follows: {baseSku}-{option3Sku}-{option5Sku}-etc. Absolute SKU. The product's base SKU is ignored. The final SKU will only have SKUs of selected options, i.e.: {option3SKU}-{option5SKU}-etc. Fixed SKU. The options' SKUs are ignored. The final SKU will always be the product's base SKU. 2.3.2.4. Relative Weight, Absolute Weight, Fixed WeightA custom options may have its own shipping weight. You can use one of the following weight policies: Relative Weight. The final weight includes the product's base weight and the weight of all selected custom options. Absolute Weight. The product's base weight is ignored. The final weight will be the sum of weights of all selected custom options only. Fixed Weight. The options' weights are ignored. The final weight will always be the product's base weight. 2.3.3. Option Template ManagementThis area allows to create, edit and load custom option templates into the product. 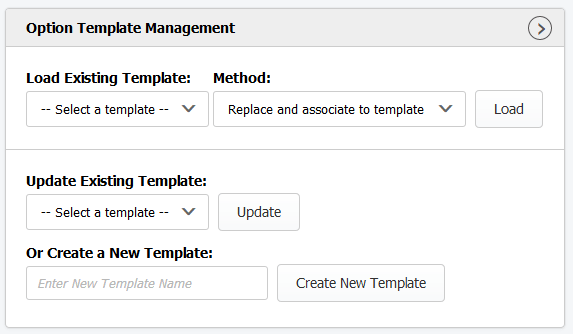 Load Existing Template – select a template you want to load custom options from. Method – provides four loading methods:
Button "Load" – click to load the selected template using the selected method. Update Existing Template – updates the chosen template with the current option configuration. Select a necessary template in the dropdown and click "Update". Or Create a New Template – creates a new template based on the current option configuration. Enter a new template name in input box and click "Create New Template". 2.3.4. Options ConfigurationBy default there is one section with an empty 3x3 table. You can change the table size using dropdowns "Columns" and "Rows". If you need more sections click the "Add New Section" button. Each section has its own table and options. Custom options are created within the table cells. Hover an empty cell and click the "pen" icon to configure a new custom option. See a picture below. You can move custom options. Simply drag&drop them to a new place. 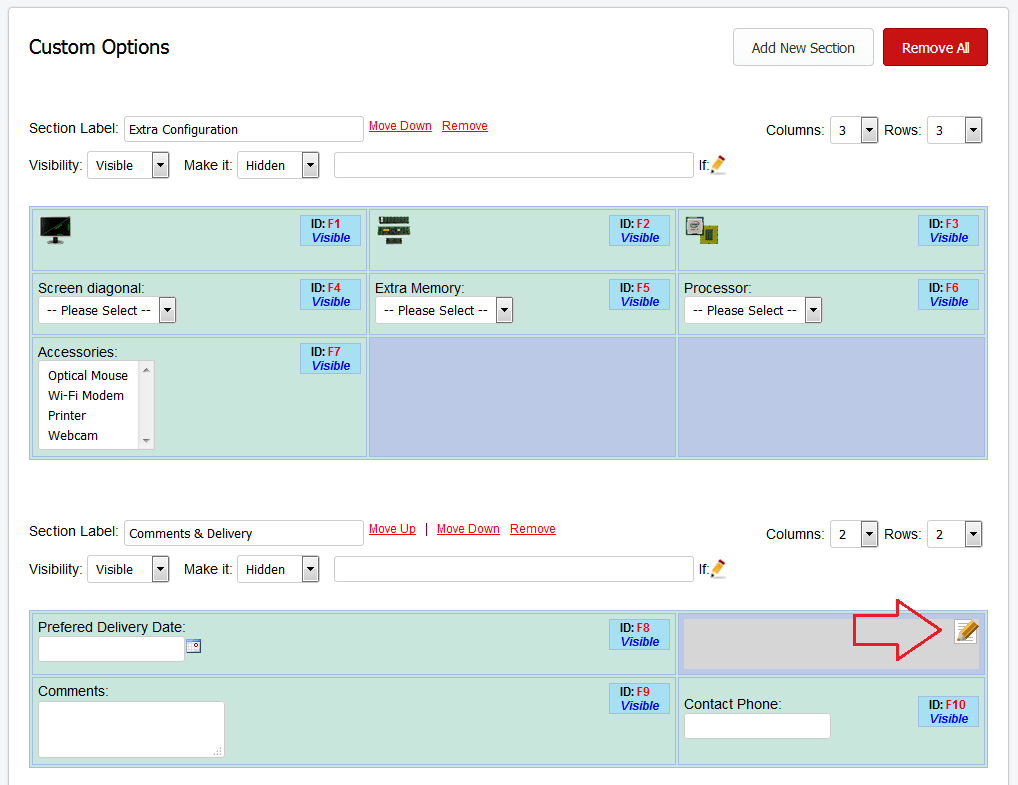 Section Label – the section title your customers will see on the Storefront. To remove the entire section click the "Remove" link. To reorder sections click the "Move Up" and "Move Down" links respectively. The entire section may depend on a specific field and visibility condition. For instance, you want to hide/unhide the entire section if a specific option selected by the customer. In this case set the default visibility of the section to Visible or Hidden. And set the condition when it should turn the state, i.e. make it Hidden or Visible IF {condition}... Click the "pen" icon to build a condition. To remove all custom options and sections click the "Remove All" button. 2.3.4.1. General SettingsAll options share a number of the same settings while the other have unique settings. Below are common setting:
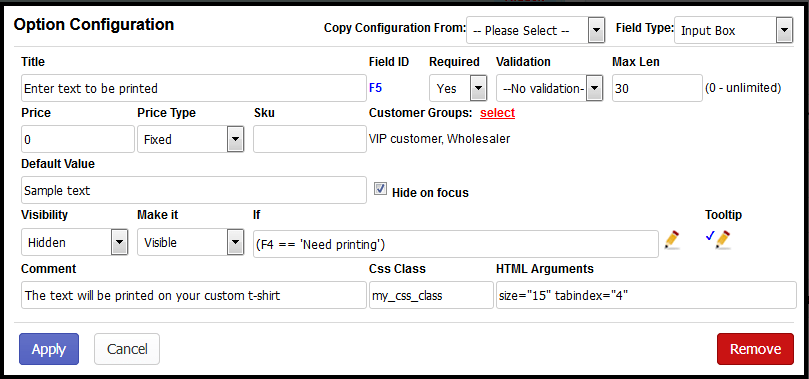 Click button "Apply" to save the option, "Cancel" to go back without changing the option or "Remove" to delete the option. 2.3.4.2. Properties of Input BoxTo create an input box select "Input Box" in dropdown "Field Type". The following additional settings will be available (for the general settings please see Chapter 2.3.4.1): 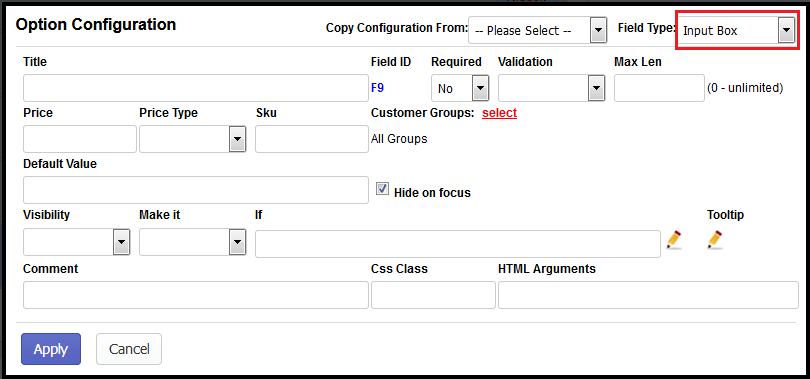
2.3.4.3. Properties of TextareaTo create a textarea select "Textarea" in dropdown "Field Type". The following additional settings will be available (for the general settings please see Chapter 2.3.4.1): 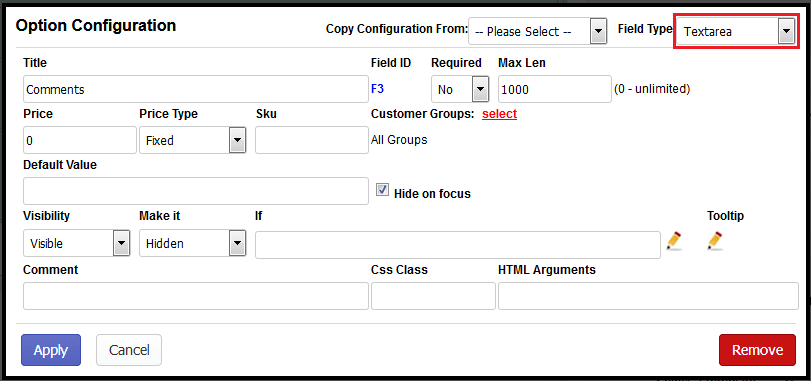
2.3.4.4. Properties of FileTo add a file select "File" in dropdown "Field Type". The following additional settings will be available (for the general settings please see Chapter 2.3.4.1): 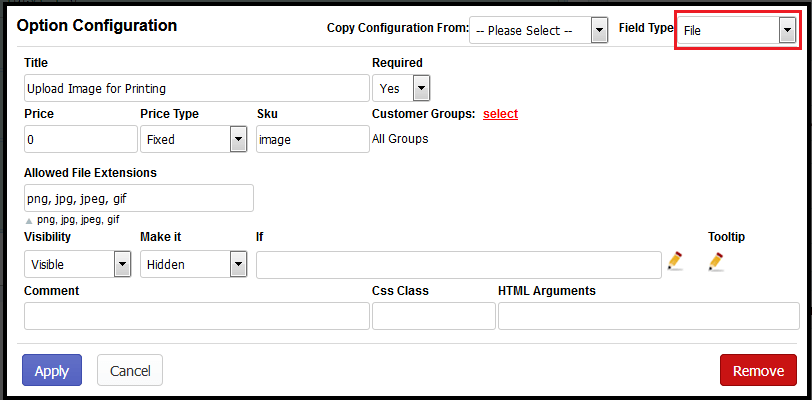
2.3.4.5. Properties of DropdownTo add a dropdown select "Dropdown" in "Field Type". For the general settings please see Chapter 2.3.4.1. 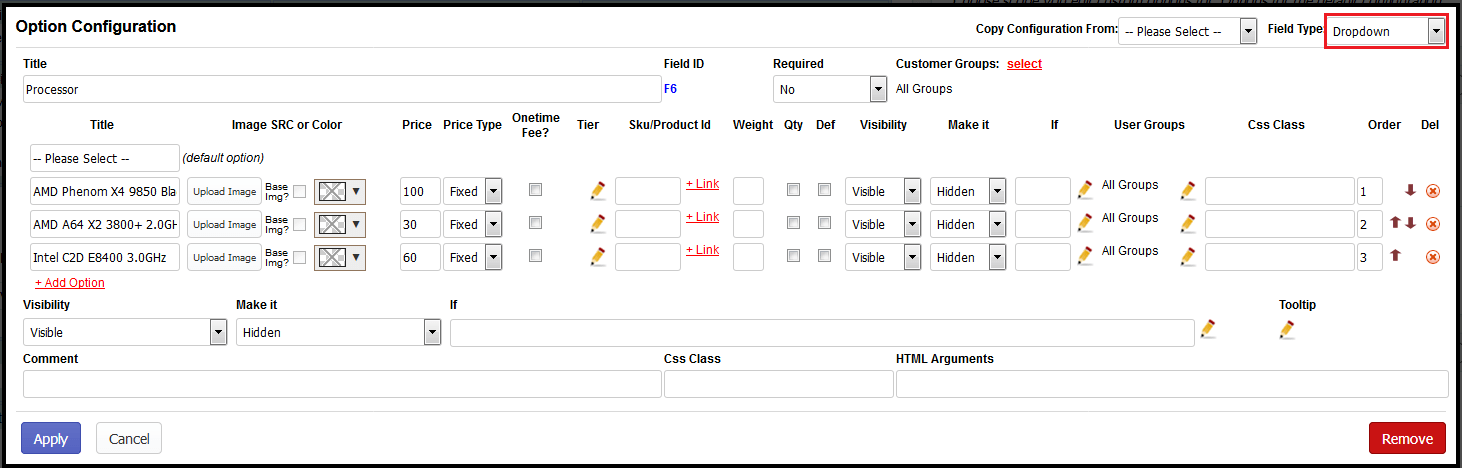 To add more options click link "+ Add Option". Each option has the following settings:
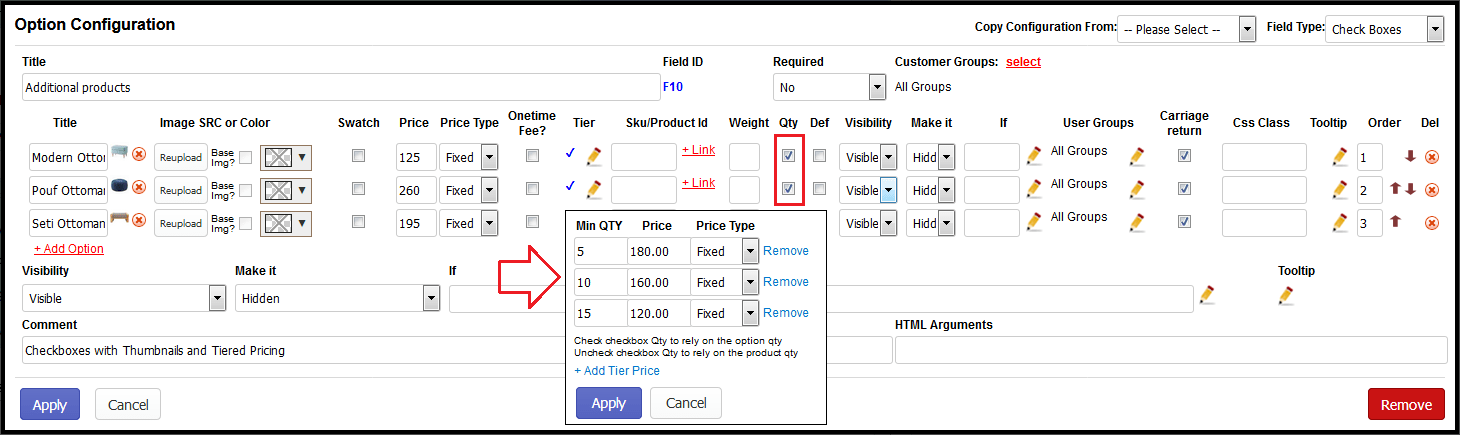 Each dropdown option may have its own quantity field. Check the "Qty" checkbox to show the Quantity inputbox next to the option on the Storefront. If option has no quantity field, tier prices will rely on the quantity of the product itself. To add another quantity break click link "+ Add Tier Price". In field "Min QTY" enter the minimum quantity the tier price is set for. Then enter the tier price itself in column "Price". In dropdown "Price Type" choose if the tier price is a fixed amount or a percent from the product's base price. Then click "Apply", or "Cancel" to discard the changes. To remove a single tier price click the "Remove" link.
2.3.4.6. Properties of Radio ButtonsTo add radio buttons select "Radio Buttons" in dropdown "Field Type". For the general settings please see Chapter 2.3.4.1. For additional settings see Chapter 2.3.4.5. 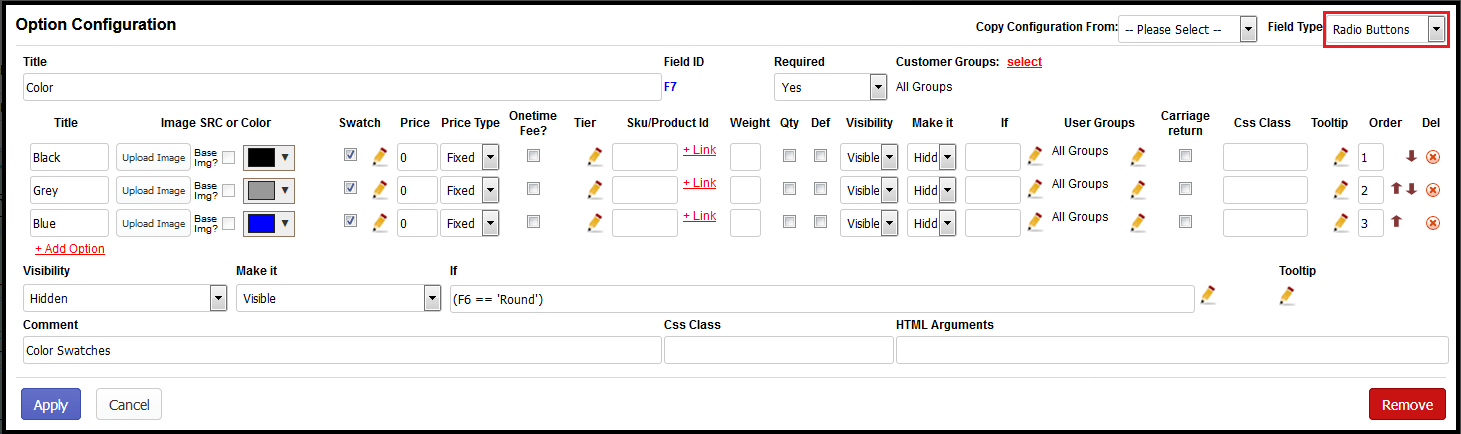 2.3.4.7. Properties of Check BoxesTo add checkboxes select "Check Boxes" in dropdown "Field Type". For the general settings please see Chapter 2.3.4.1. For additional settings see Chapter 2.3.4.5. 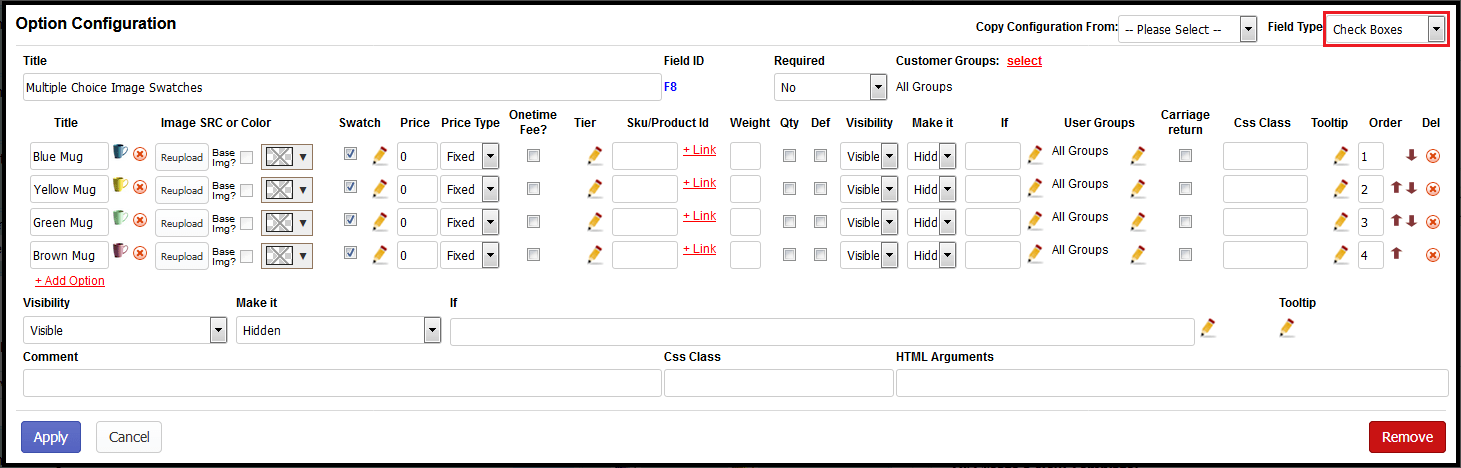 2.3.4.8. Properties of Multiple SelectTo add a multiple select choose "Multiple Select" in dropdown "Field Type". For the general settings please see Chapter 2.3.4.1. For additional settings see Chapter 2.3.4.5. 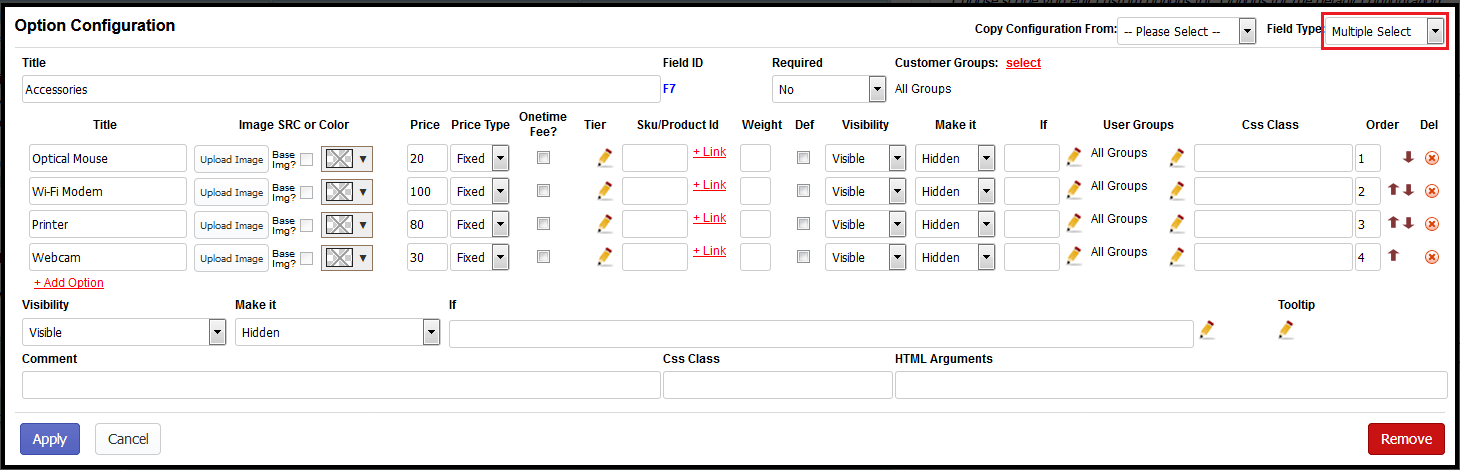 2.3.4.9. Properties of DateTo add a date selection option choose "Date" in dropdown "Field Type". For the general settings please see Chapter 2.3.4.1. This option adds an input box with a date selector (calendar) on the Storefront. 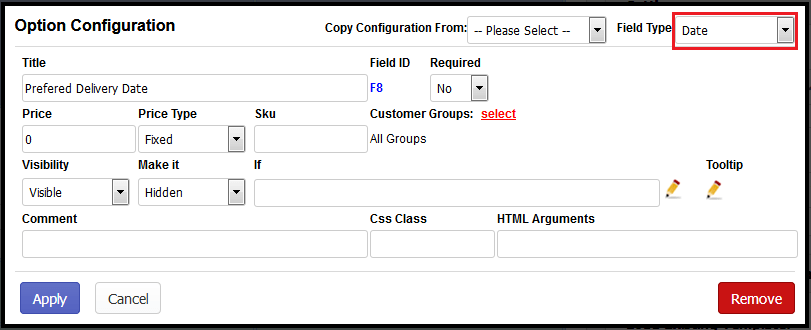 2.3.4.10. Properties of ImageYou can add an image by choosing "Image" in dropdown "Field Type". The following additional settings will be available (for the general settings please see Chapter 2.3.4.1): 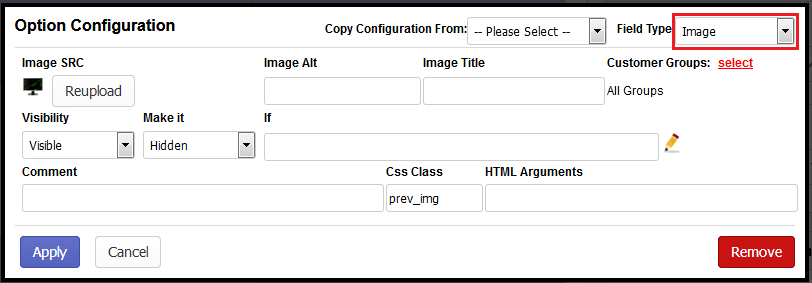
2.3.4.11. Properties of DIV/HTML TextWith this field you can add your own HTML elements on the form, such as tables, images, videos, additional JS widgets, etc. 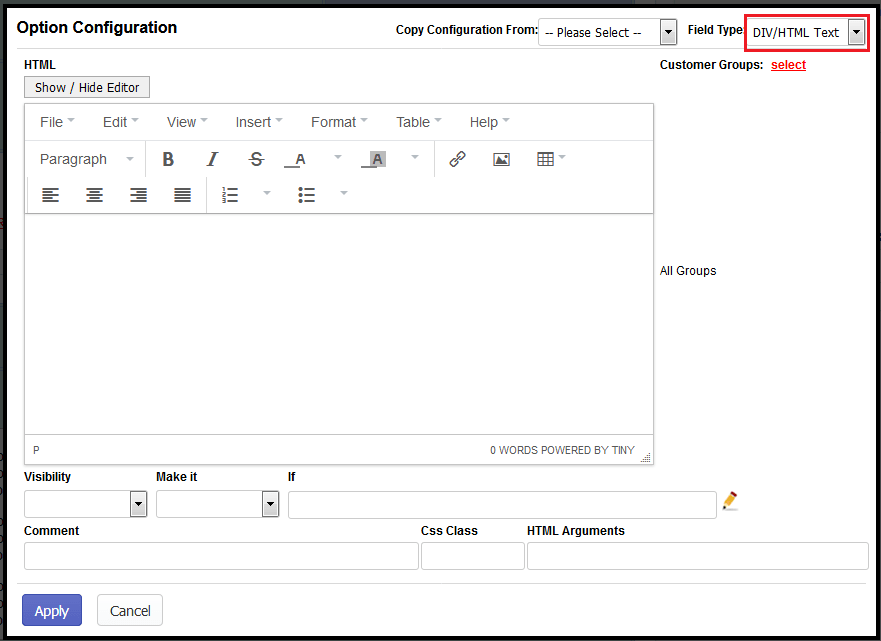
2.3.5. CSS Adjustment and Extra JavaScript textareas (for advanced use only)The CSS Adjustment textarea allows to add custom CSS styles. You can modify the look of options, e.g. colors, font size, margins, background, etc.  The Extra JavaScript textarea is used to embed custom JS functionality to form, like 3rd-party widgets, AJAX, custom validation, etc. You need to have experience in JavaScript to use it. 2.4. Customer GroupsTo manage customer groups go to Apps > Dynamic Product Options > Customer Groups. 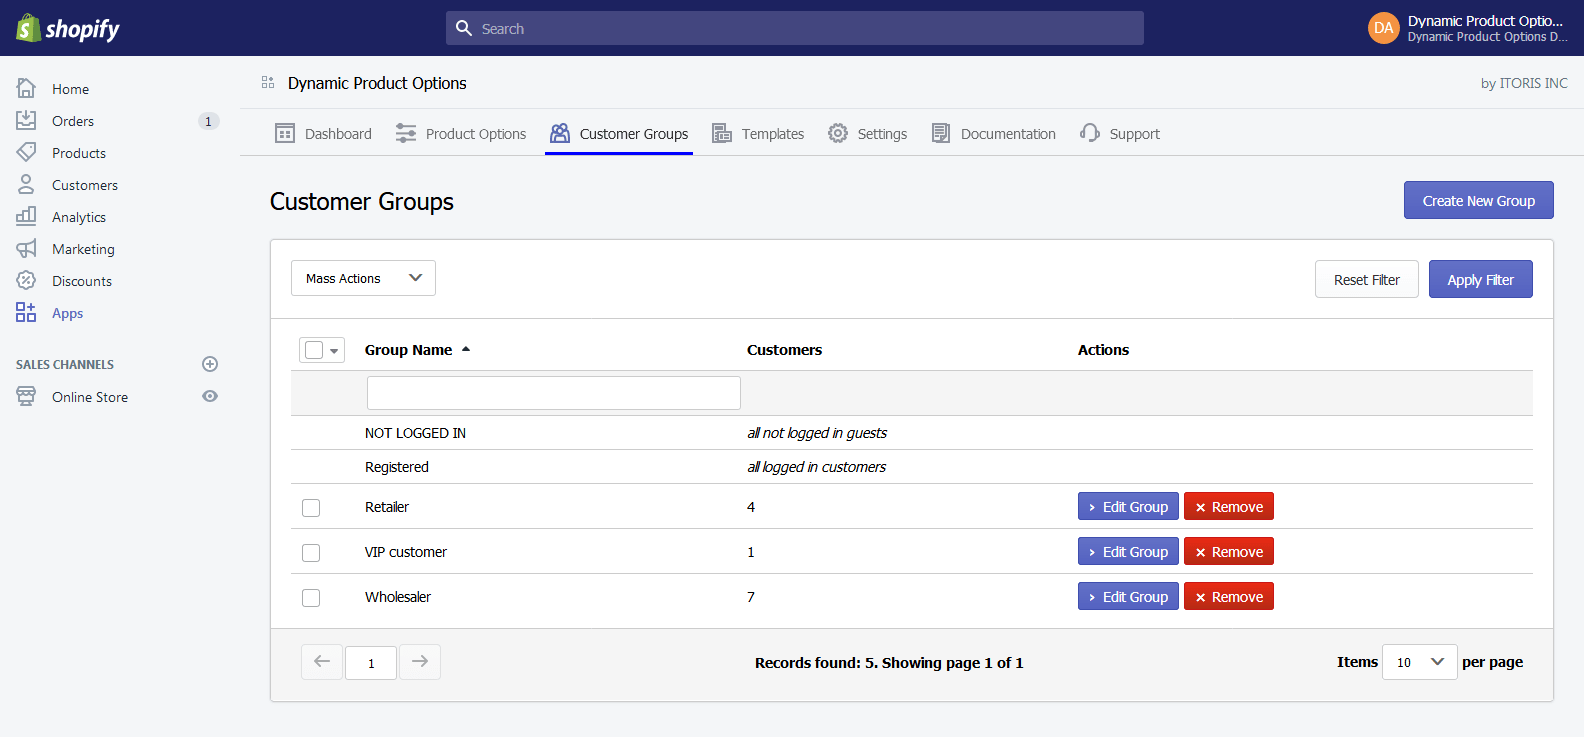 The table displays all groups including the system "NOT LOGGED IN" and "Registered" ones. To create a new group click button "Create New Group". To edit group click button "Edit Group" next to the group. To remove group click "Remove" next to the group. The system groups can't be removed. To remove multiple groups together select them on the grid and choose mass action "Remove Groups". 2.4.1. Create/Edit Group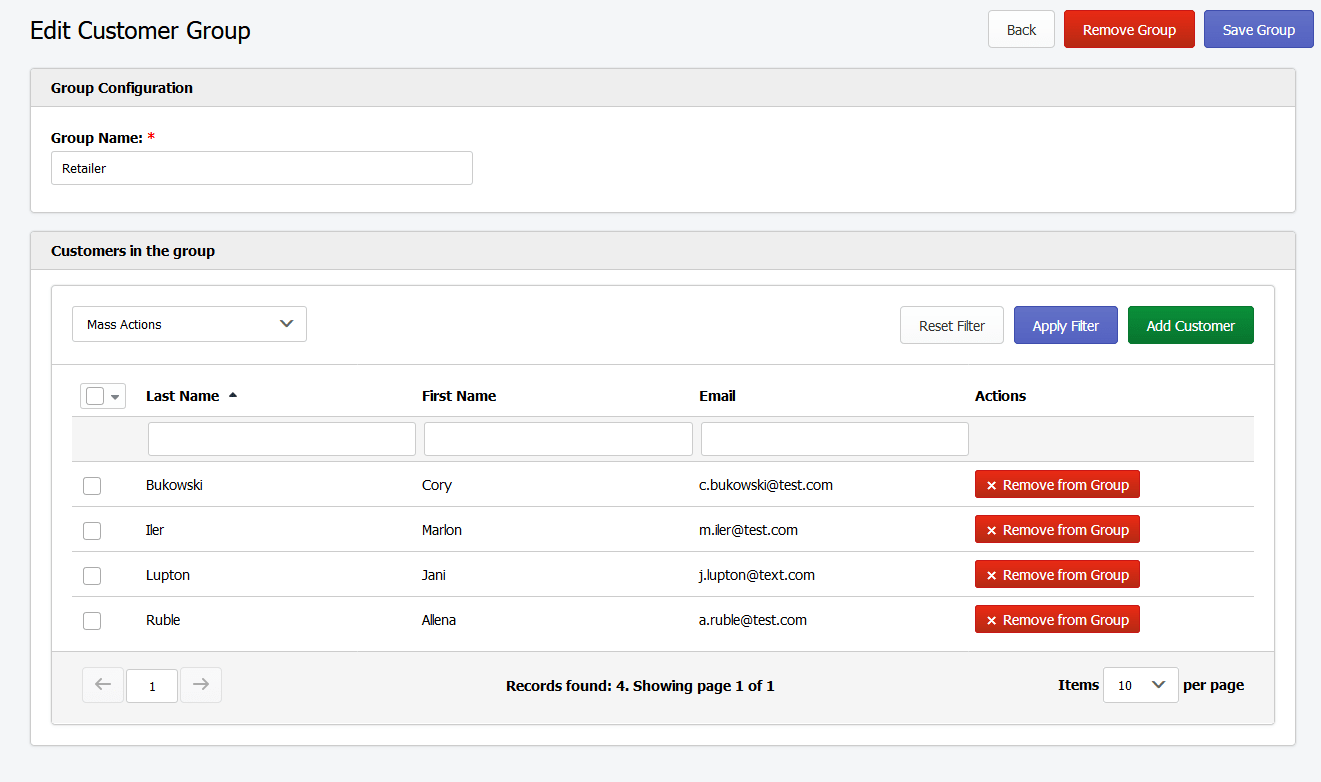 To create a new group enter the group name and click button "Create Group". To remove the current group click button "Remove Group". 2.4.2. Add Customers to GroupAfter group has been created, you can add customers into it. Click button "Add Customer". A modal window will appear with the list of all customers registered in your store. 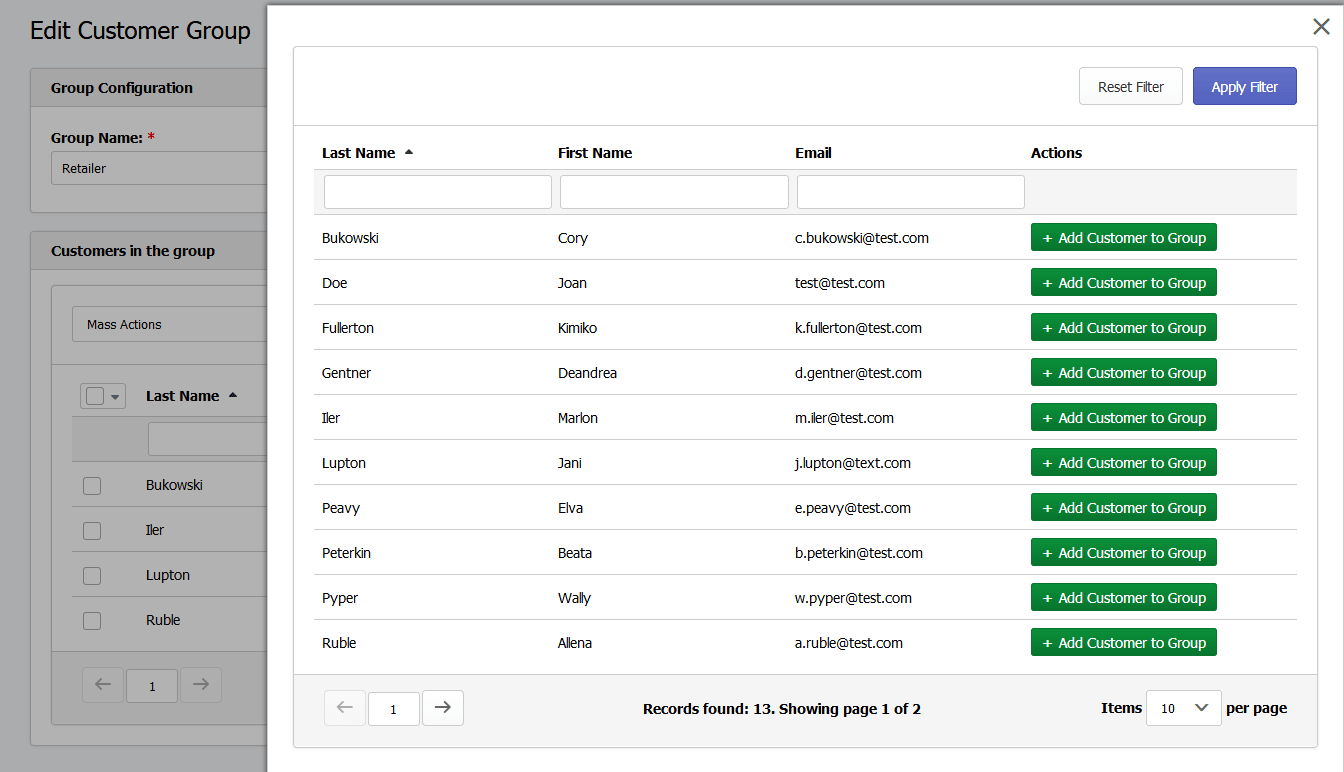 Search customers by the last or first name, or by email address. Then click button "+ Add Customer to Group". To remove a customer from the group click button "Remove from Group". 2.5 Product Option TemplatesThe app is aimed to simplify options editing for multiple products and provides the advanced option template functionality. All created option templates are stored following: Apps > Dynamic Product Options > Templates. 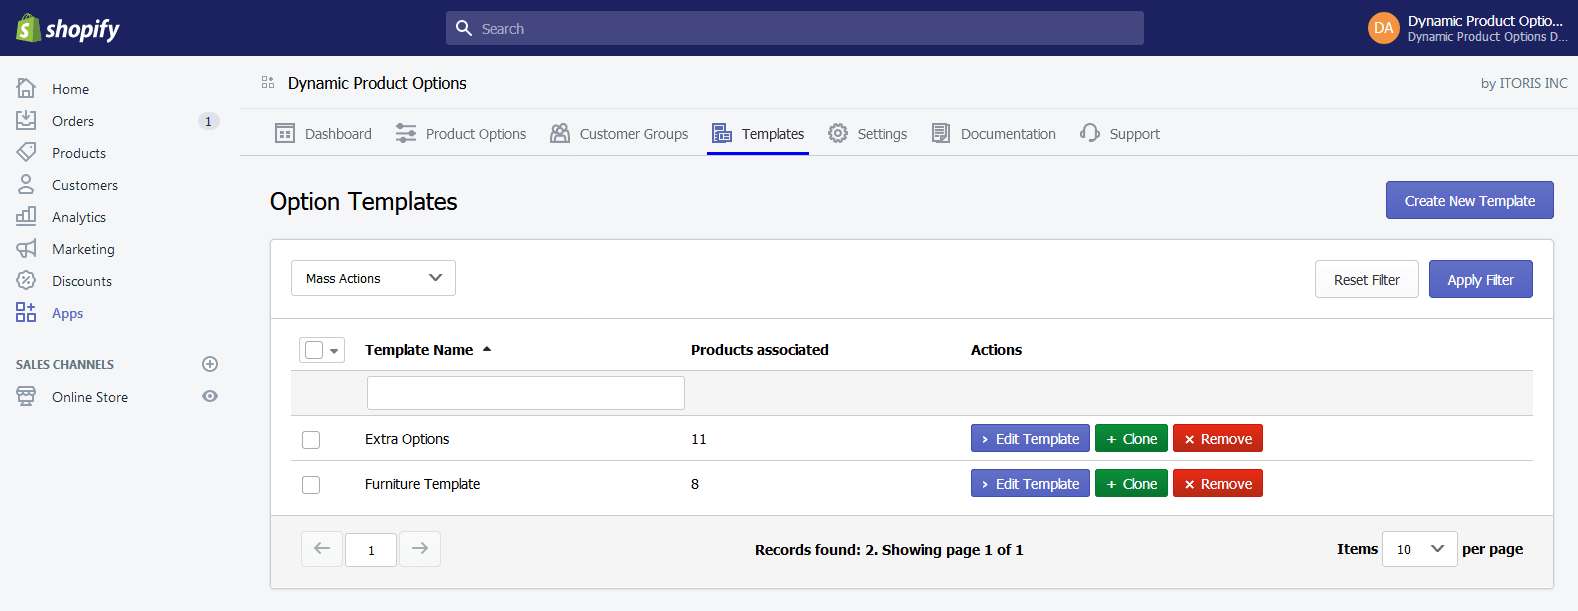 To create a new template click button "Create New Template". To edit existing template click button "Edit Template" next to the template. If you need a copy of a template click button "Clone". It's useful in cases when you need another template with only a few changes in it. To remove a template click button "Remove". If you want to remove multiple templates at once use mass action "Remove Templates". 2.5.1. Edit TemplateThe custom options in a template are configured the same way as in products. 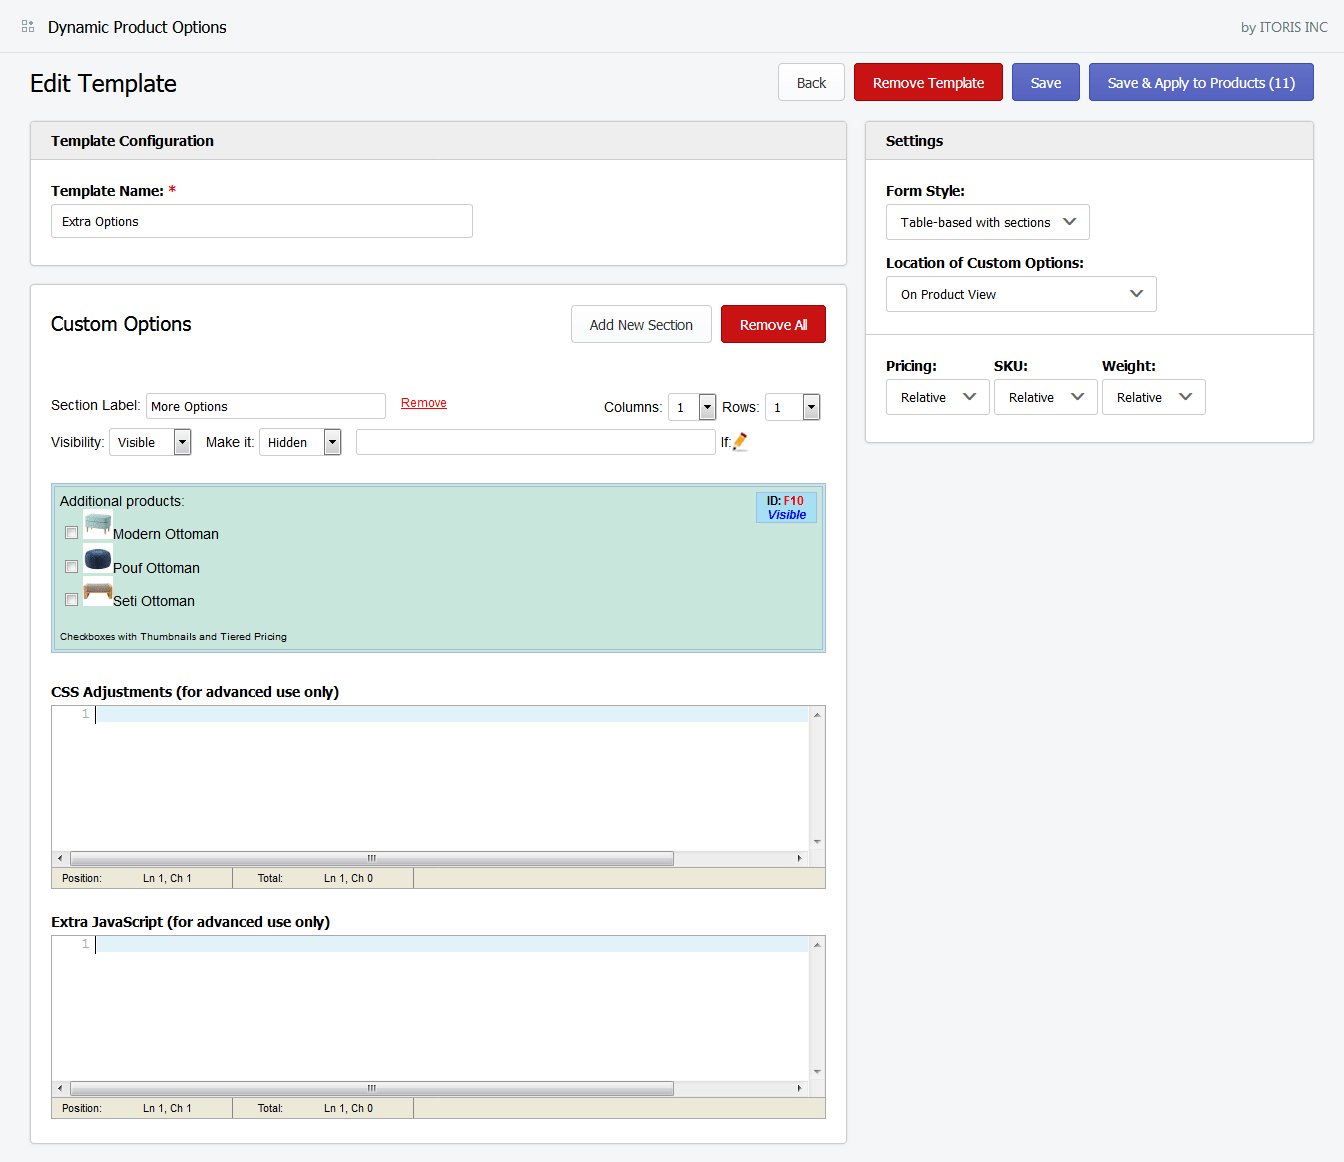 The editing area is divided into the following blocks:
Click button "Back" to navigate to the list of all templates. To remove the template click button "Remove Template". Save changes by clicking the "Save" button. If you want to apply changes to all associated products click button "Save & Apply to Products". The button is visible only if the template is assigned to at least one product. After clicking the button you will see a progress bar. Please wait until you get 100%. 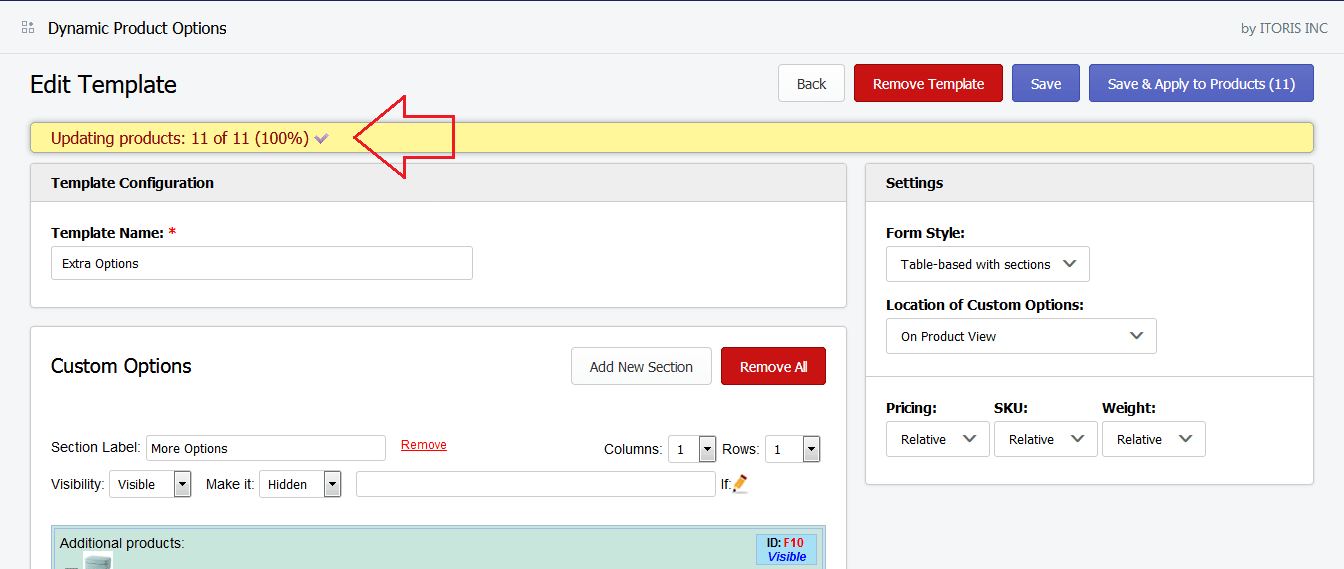 2.6. Dependent Custom OptionsWith this app you can create dependent custom options. The functionality allows to save space on the product view or offer customers relevant options only by making one option dependent on the other one. You are able to create a chain of dependent options, manage the visibility of a section or hide the whole sections with fields in it based on the previous selection. 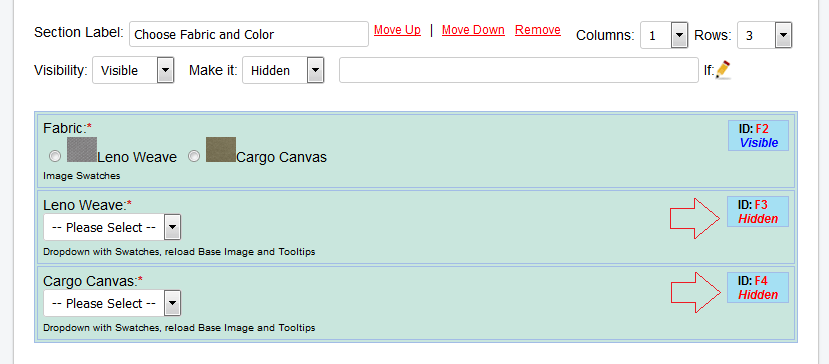 To create dependent options a special condition should be set. Please notice that the hidden options are marked with the "Hidden" label in the screenshot above. To set the conditional branching you can do the following:
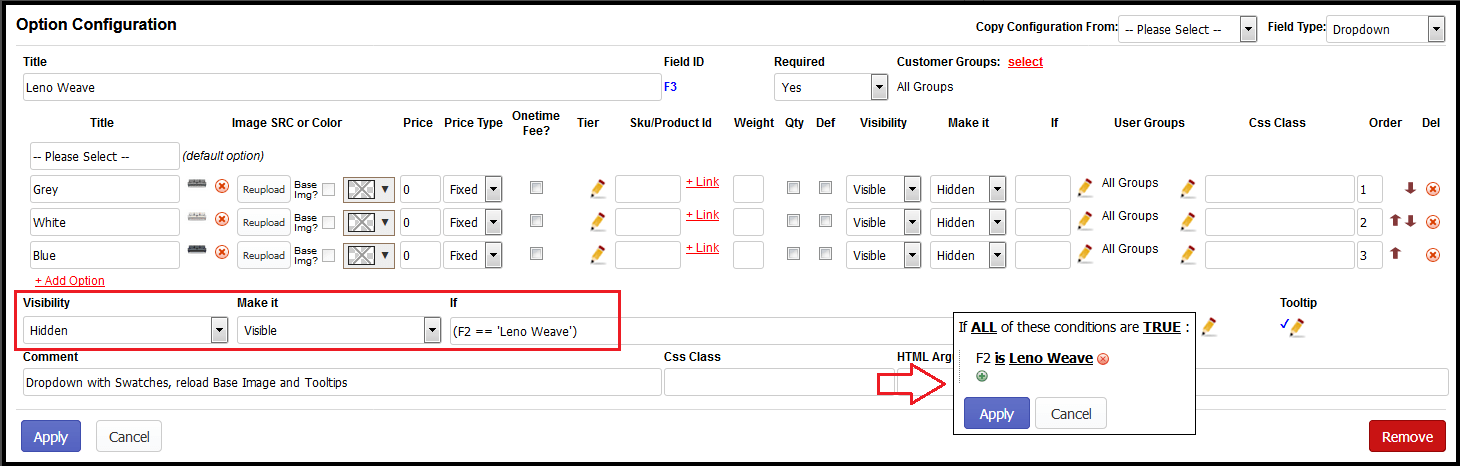
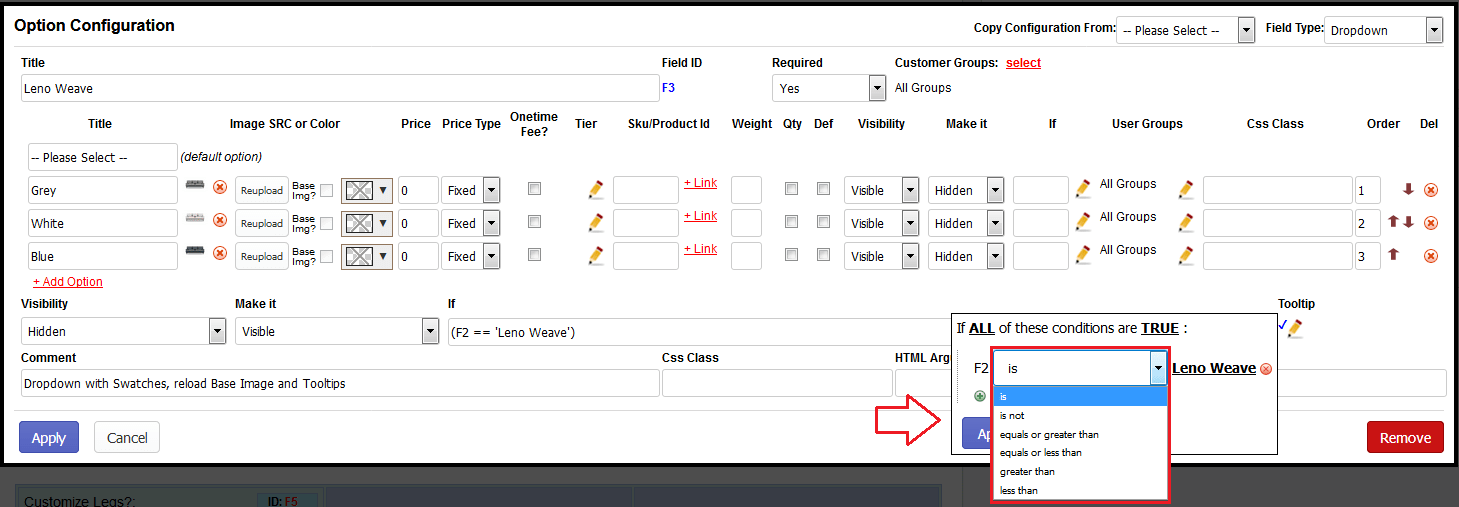 You can create a complex chain of dependent custom options as well add condition combinations relying on multiple fields at the same time. 2.7. Product Associated OptionsThe Dynamic Product Options app allows to offer more relevant products to your customers by associating options to other products or creating a bundle offer. 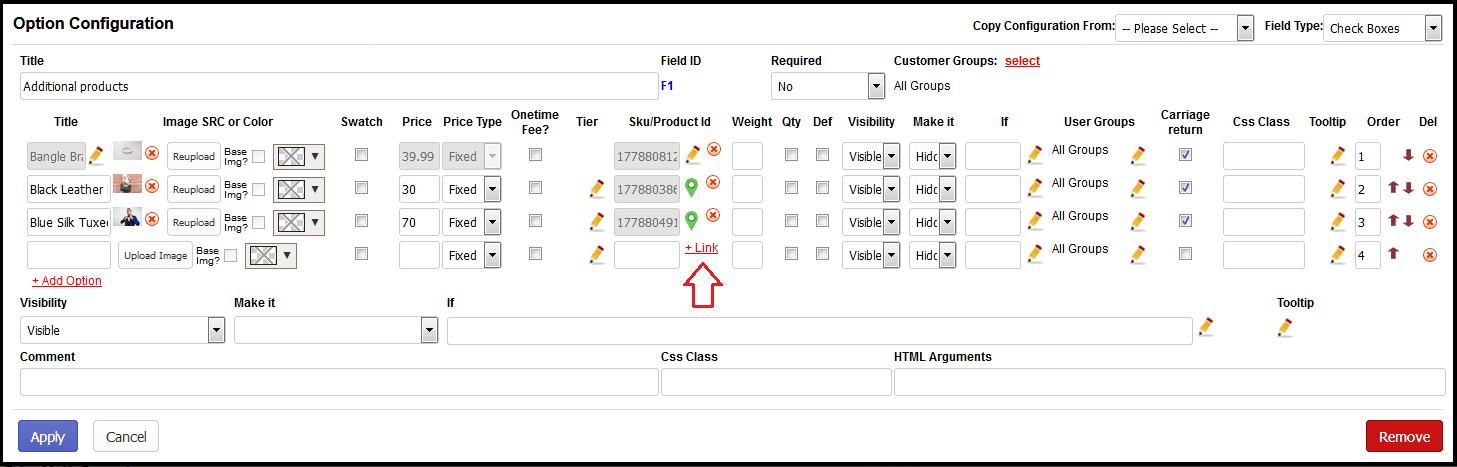 To create an associated custom option do the following:
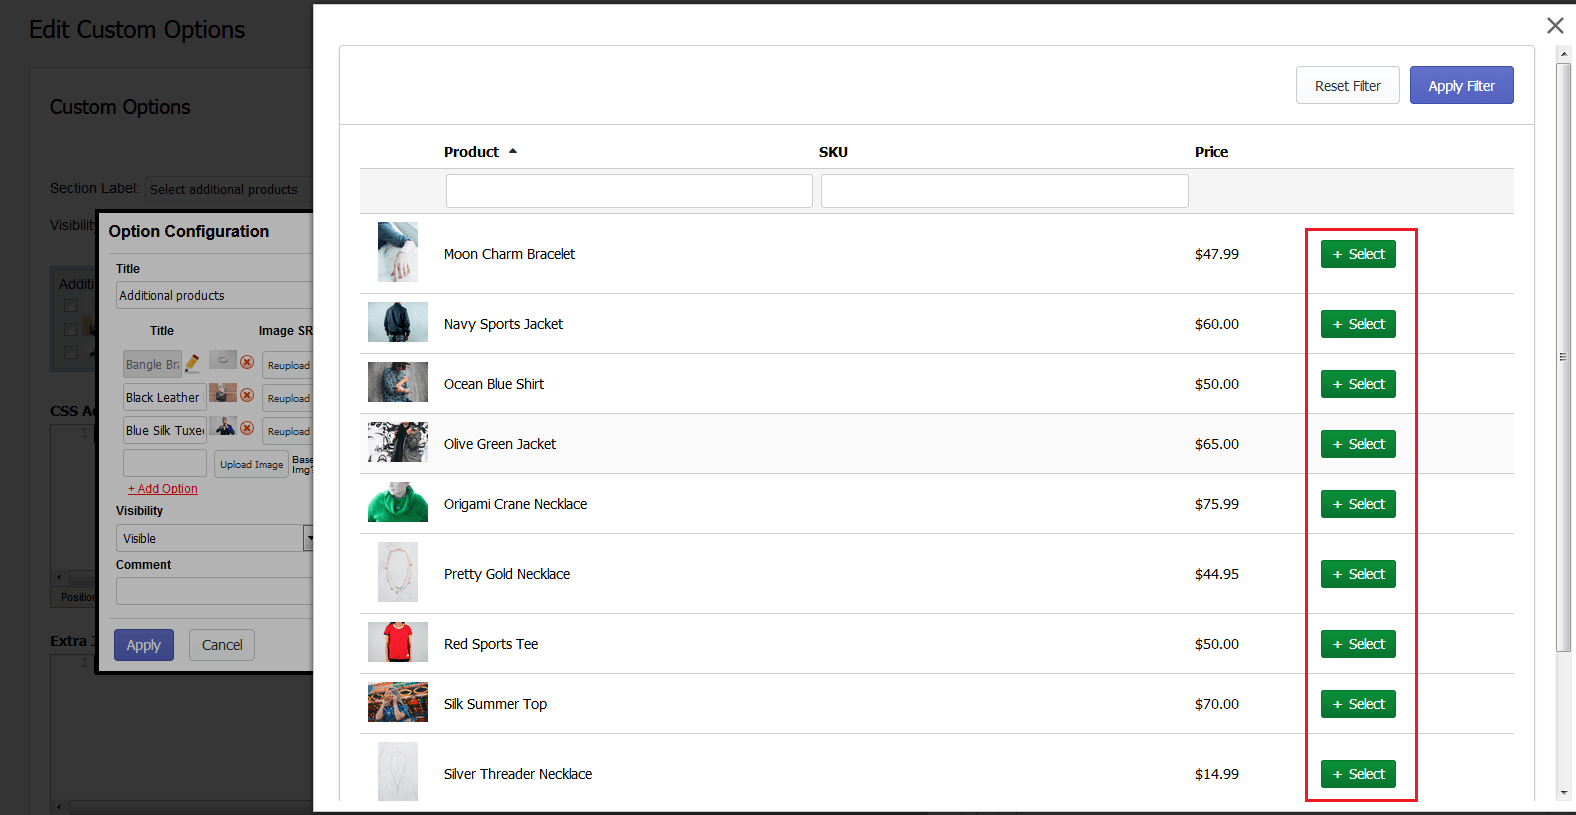
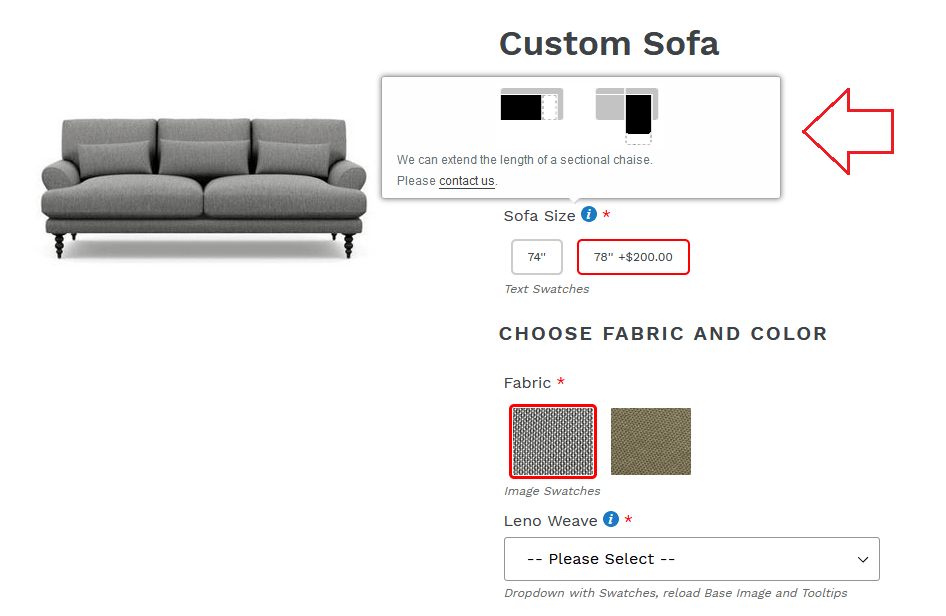
If custom option is associated to a product and is pinned to it at the same time the option's price, title and SKU will be updated on the Storefront automatically once product changed. The SKU of the associated product will be displayed next to the option in cart and in order. Customer will see the additional options on the same product view. If an option is out of stock it will be grayed out and disabled on the Storefront. Customer won't be able to select it. If the option has been selected the associated product's inventory will be deducted on checkout. You get the full inventory support on the options' level. In addition, you can enable individual quantities for options, i.e. let customers choose how many items they want to order. The option price will be multiplied by the quantity selected, i.e. {option qty} x {option price}. 2.8. Text, Image, Color and Rich-Text SwatchesThe app enhances the color and text swatches functionality allowing to use a visual color selector per option, enable the swatch setting or reload the Base Image. You can upload images or set solid colors via the color selector. To enable the color or image swatch functionality on the Storefront, mark checkbox in the "Swatch" column. The app allows to replace the base image with uploaded pictures by checking setting "Base Img?". 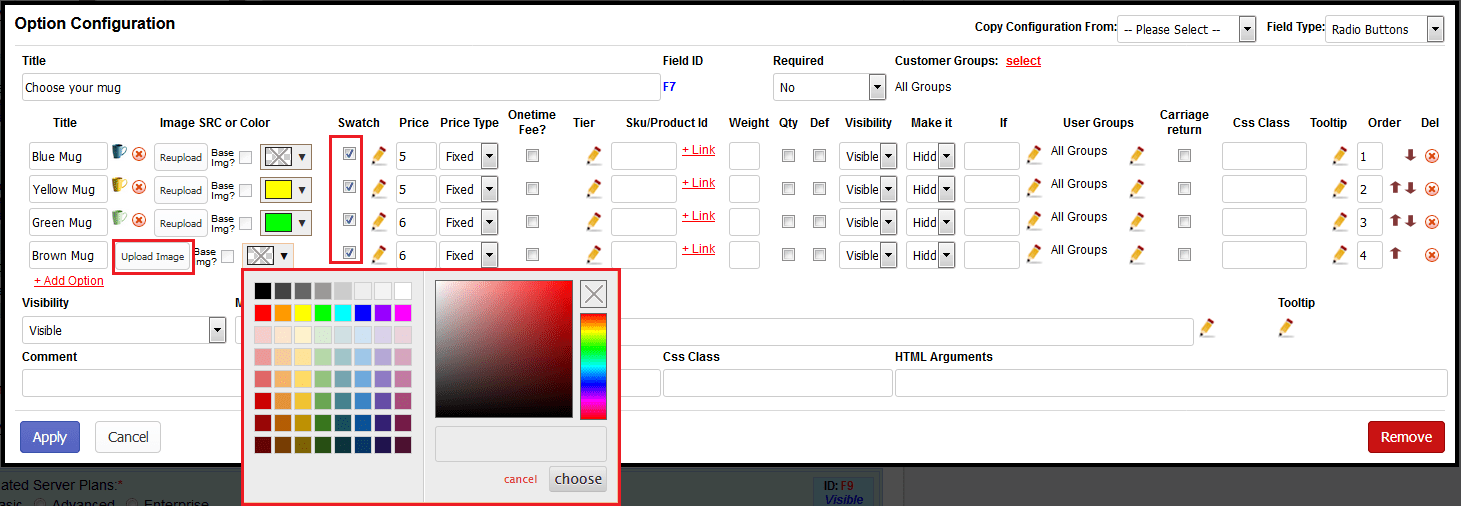 To create text swatches do not select image or color. Just mark checkbox in the "Swatch" column. 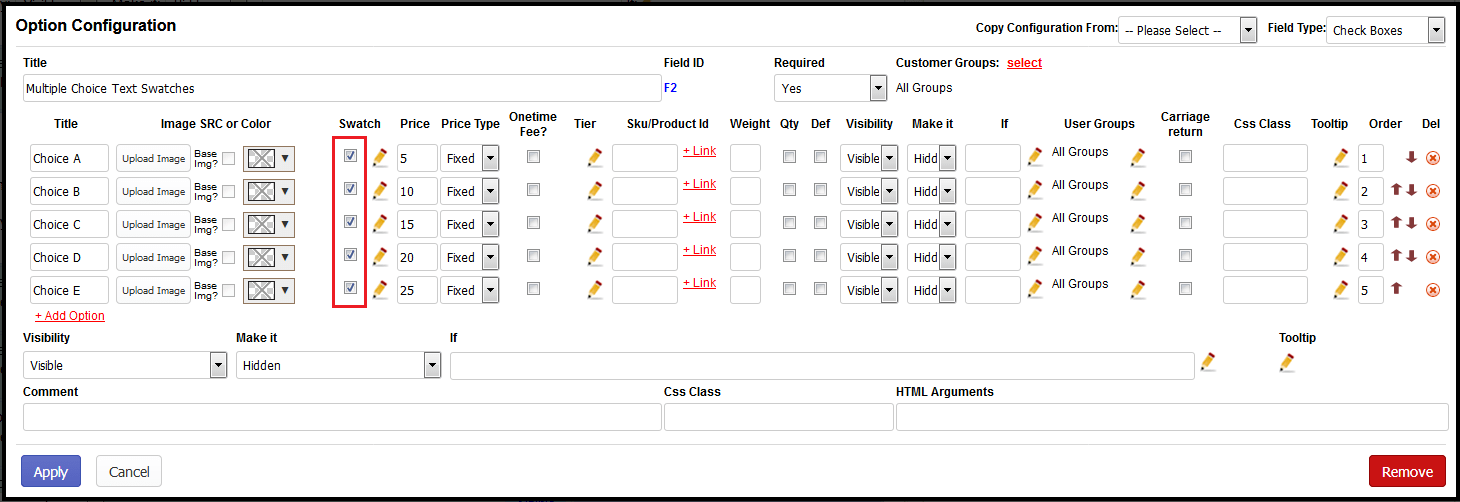 To create Rich-Text swatches click on the "pen" icon in the "Swatch" column. A WYSIWYG Editor will appear. You can design the swatch the way you need it. 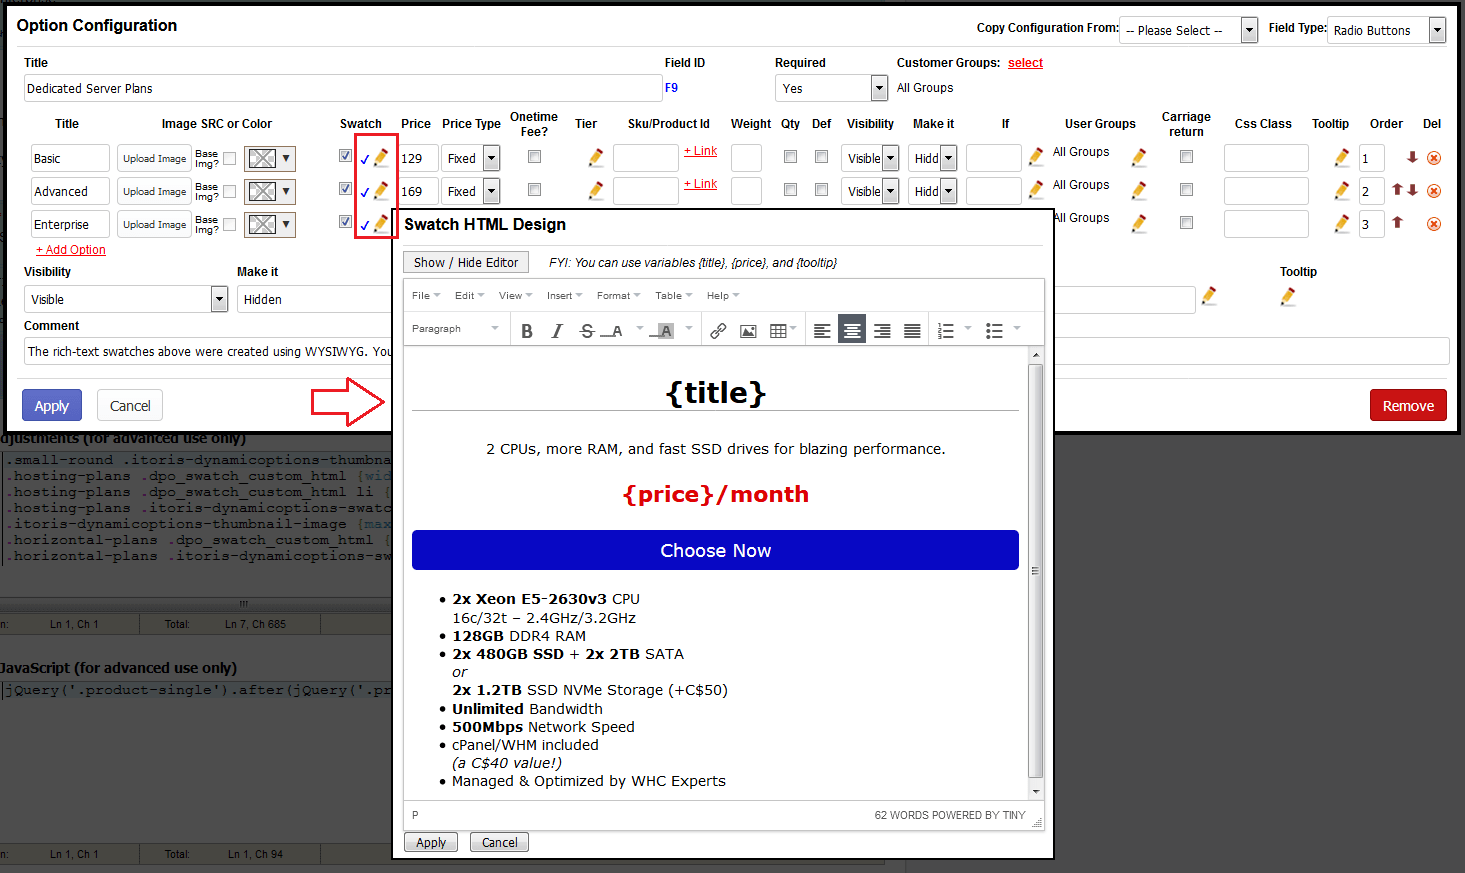 2.9. Swatches in a DropdownThe app allows to show image and color swatches in a dropdown. Create an option of the "Dropdown" type. Then configure color or image swatches in it. Here is how it will look on the Storefront:  The options in the dropdown are searchable. Customers can easily find the necessary option by typing a keyword. 2.10. TooltipsTooltips allow to provide more information about each specific option when customer hovers the option. You can add notes, links, tables, images, videos to each option or option value by using the WYSIWYG editor. Just click the "Edit" icon in the "Tooltip" column to create a tooltip. 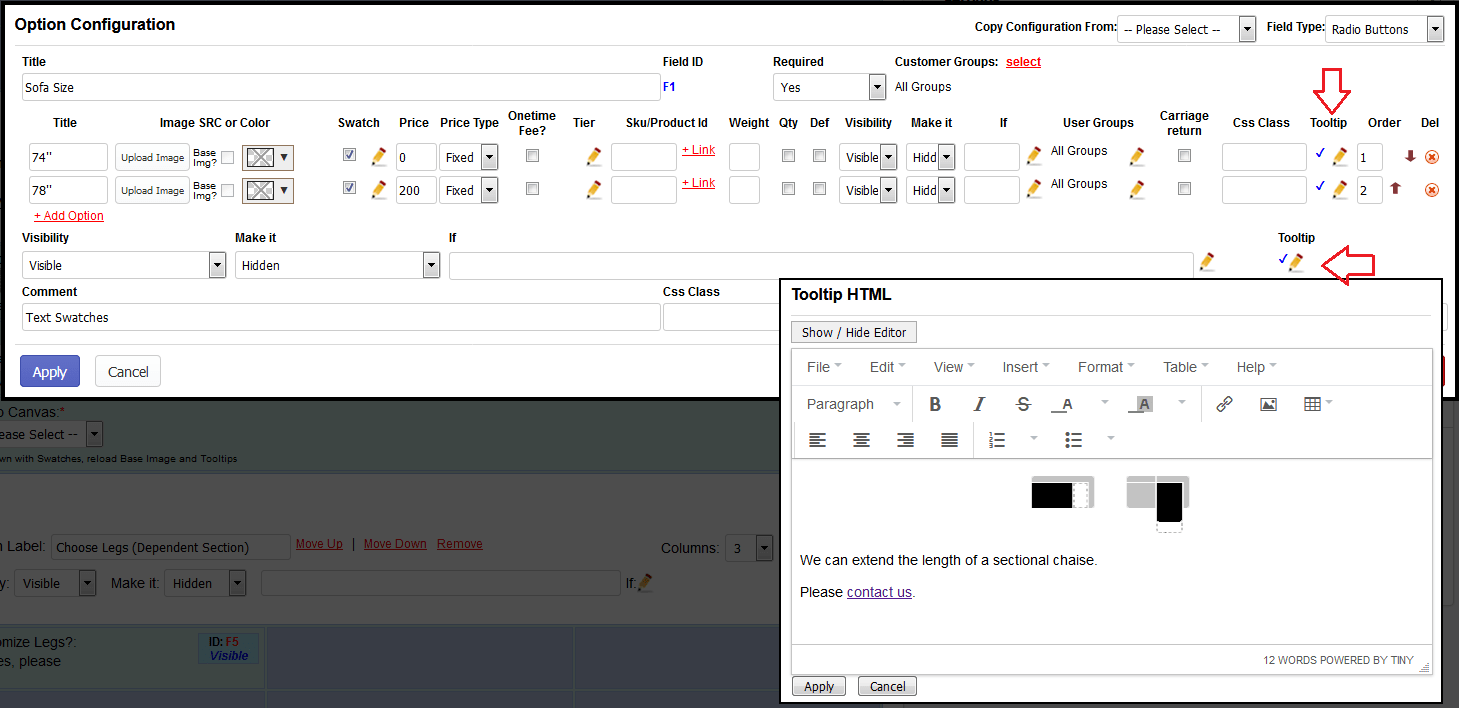 This is what the tooltips look like on the Storefront:
2.11. Math Formula PricingThe purpose of the math formula pricing is to provide more flexibility with the product price calculation. You can now use any custom mathematical formula to calculate the final product price. The input to formula is custom options the customer chooses on the form. The price formula can be of any complexity, can have math functions and constants, have conditional branching. The feature will be useful to those who needs a custom method of price calculation not supported by Shopify, such as:
2.11.1. Formula CreationFormulas can be created and edited for each product and variant individually following: Click the "Add New Formula" button to create a new formula:  2.11.2. Formula Editor Overview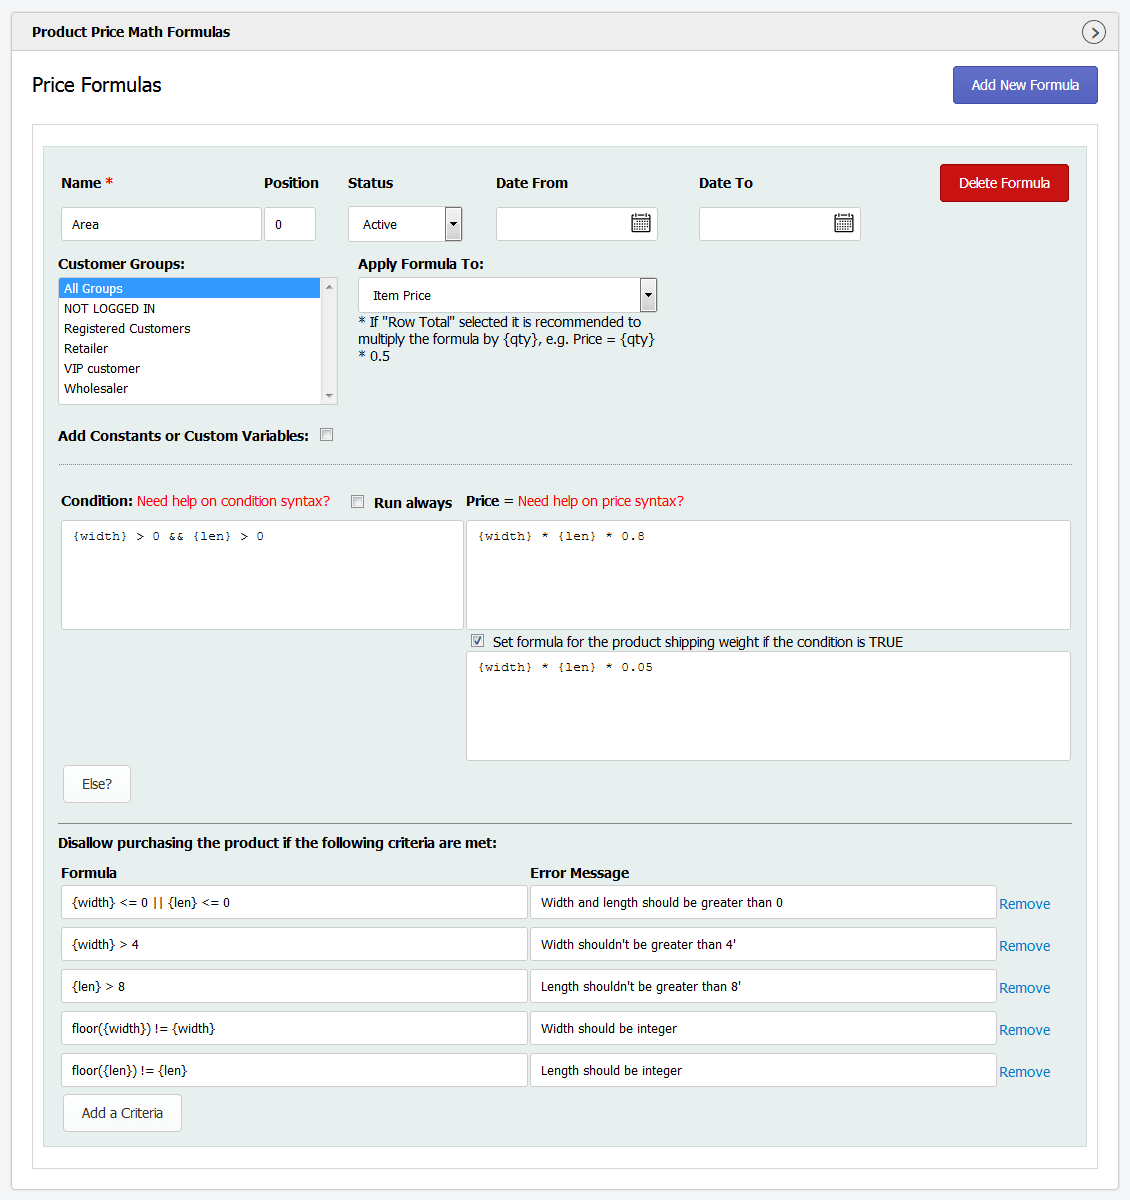 The form has the following elements: Add New Formula - button. Product can have multiple accumulative formulas executed by chain. Click this button if you want to add another formula to the product. Make sure to set the correct order in field Position. Delete Formula - button. If you no longer need a formula you can delete it using this button. You should save the product to finish deletion. Name - text field. Enter the formula title here. Not visible on frontend. Position - text field. If you have multiple formulas in the same product you should set the correct order of execution. Status - dropdown. Formula is enabled by default. You may temporarily disable it using this dropdown. Date From - Date To - range selector with calendar. If you plan to have a limited promotion specify the "from-to" dates when the formula should be active. You can set both, either, or none dates. Customer Group - multiple list box. Choose groups the formula is active for. All Groups is set by default. Apply Formula To - dropdown. This dropdown allows setting what the calculated value should be applied to. If "Item Price" selected the formula result will be applied to the item price. The row total will be calculated as the item price multiplied by the quantity. If "Row Total" selected the formula result will be applied to the row total not depending on the quantity selected. The item price will be calculated as the division of the calculated row total and the quantity. Show Product Price on Frontend as - dropdown. Visible if "Row Total" is selected in the previous dropdown. If "Default" selected the customer will see the "price per item" on the product view on frontend. If "Multiplied by the QTY" selected the customer will see the row total value. It's useful when you calculate the package price based on multiple conditions, to show the final price to the customer before adding product to cart. Condition - text area. Condition defines when formula should be executed, for example: Need help on condition syntax? - link. Shows tips on the condition syntax. Run always - checkbox. This checkbox will disable the Condition textarea, meaning the formula will always run without conditions. Also, you will not be able to fork the condition using button "Else". Price= - text area. Enter your formula here. It should result to a float value. For example: Need help on price syntax? - link. Shows a hint on the price syntax. Set formula for the product shipping weight if the condition is TRUE - checkbox. Check this checkbox if you want to override the product shipping weight. If checked a text area appears below it, where you enter your custom formula for the product weight. Else? - button. Using this button you can fork your condition and add another formula. New set of fields will appear for Condition, Formula, and Weight. For example, custom tier price for quantities up to 10, 20, and 30 and if length is 20 or greater: Disallow purchasing the product if the following criteria are met: Formula and error message - text boxes. Your custom validation criteria. Enter the formula and the error message. You can create multiple validation messages. Examples: 2.11.3. Using Custom Options in FormulasYou can pass the data entered by customer via the custom option variables. Variables are enclosed into curly braces: {variable}. All variables currently supported by the app are listed in the Appendix A. To use custom option in formula the option should have a unique SKU. 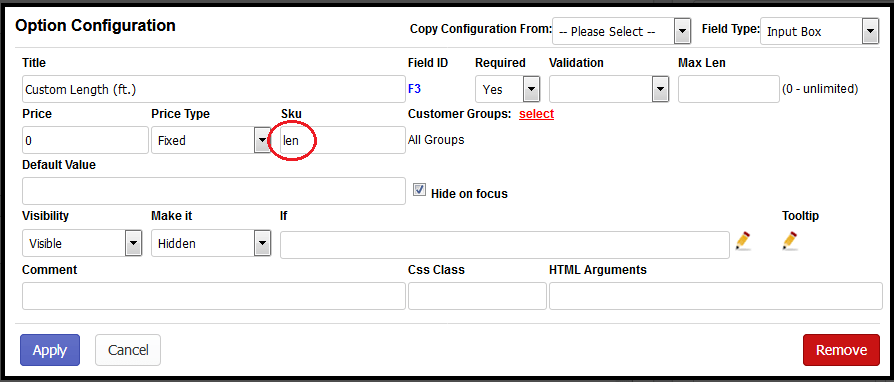 In the screenshot below we have 2 options - Width and Length, SKUs are "width" and "len" accordingly. Our variables will be {width} and {len}: 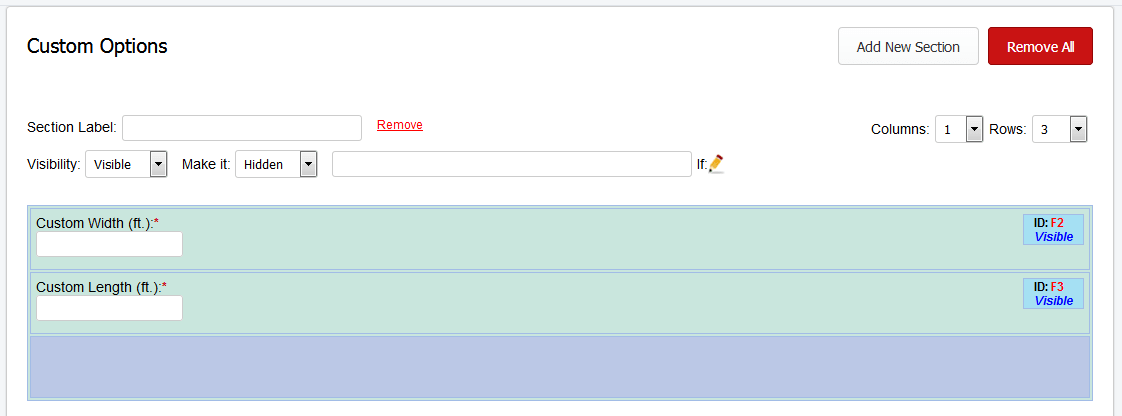 If custom option is a Field or Textarea the dynamic variable returns a string. If string is numeric it is converted into the number automatically. If custom option is a Dropdown, Checkbox, or Radio, i.e. has sub-options, the variables will return the sub-option title. You can use such variables as Boolean variables, i.e.: If you have a Dropdown with numeric sub-options, you can use the values in the formula as well: If variable is not set it returns 0/false. You can get the option price using variable {sku.price}, for example: If your price relies on the length of text entered you can use variable {sku.length}, for example: If you enabled quantities for options you can use variable {sku.qty}, for example: 2.11.4. Other variablesSelected quantity: {qty} 2.11.5. Accumulative PriceIf you have a long formula it is possible to set up a few smaller ones and make the price accumulative. Create multiple formulas by clicking "Add New Formula" button. Set the correct order in field Position. The accumulative price is summed via variable {price}. Each next formula has {price} calculated by the previous formula. Example: [Formula 1, position 1] - Material price [Formula 2, position 2] - if chair selected in addition 2.11.6. Sub-Conditions The app allows to have conditions directly within the formula using a special syntax. For example: Here, it adds the custom option price to the final price depending on the dropdown option selected. 2.11.7. Mathematical functionsYou can use math functions like sin, cos, tan, etc. in your formulas or conditions. For example: Please find the list of all supported math functions in Appendix A. Appendix AUse the following condition and math operators:
Math functions:
Constants:
Variables:
|