How to discount products in Magento 2 |
| Magento 2 Discussion |
| Written by ITORIS Team, 2018-05-21 |
|
One of the most effective ways to sell products online is to use different pricing deals and discounts. There are a couple of options on how to set up pricing discounts in Magento 2: Special Pricing, Tier Pricing and Catalog Price Rule. Definition of Special PricingSpecial Pricing is a promotional type of campaign, which has a time-limited nature. Product discounts will be displayed both in the catalog and product detail pages while the normal price will be greyed out. How to set up Special Pricing in Magento 2To set up a Special Price rule in Magento 2, you will need to do the following: Step 1: Go to Catalog→ Products; Step 3: In the basic settings panel, go to Advanced Pricing menu. A new window should open up:
Step 4: Enter the desired value for your Special Price along with Special Price From, Special Price To and other values. Click the Done button to finish:
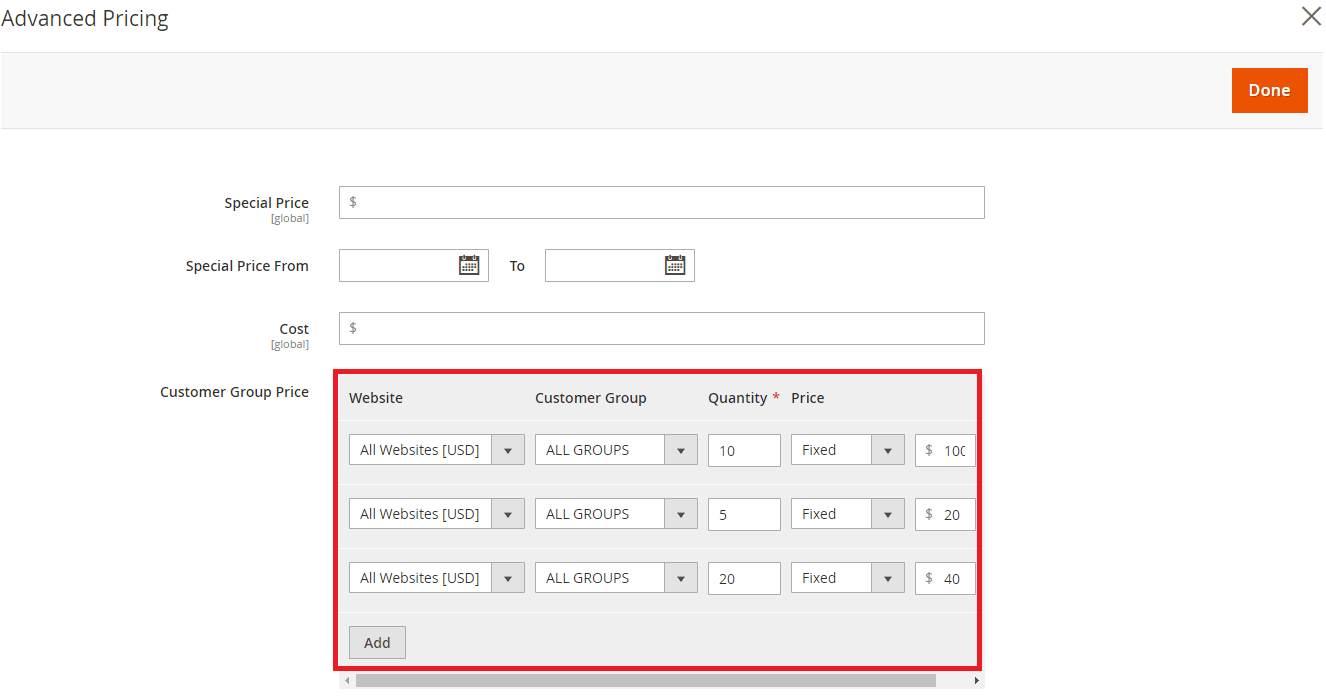
Definition of Tier PricingTier pricing is a quantity discount which is normally displayed in a specific store view or customer group. Tier Pricing allows you to offer a quantity discount from the catalog list and product detail pages. How to set up Tier Pricing in Magento 2To set up a Tier Pricing rule from the Admin account on the Magento 2 platform: Step 1: Go to Catalog → Products; Step 3: In the basic settings panel, go to Advanced Pricing menu. A new window should open up:
Step 4: In the Customer Group Price area, click the Add button and:

Definition of Catalog Price RuleThe Catalog Price Rule is one of the instruments you can use to discount the existing products. It’s based on the conditions defined during the configuration process. Take an advantage of this instrument to create discounts, special offers and edit them whenever necessary. How to create Catalog Price RuleStep 1: Once you’re logged into an admin account, go to Marketing → Promotions → Catalog Price Rule and click the Add New Rule button:
Step 2: Next, you’ll find 3 main sections which you’ll need to fill in: Rule Information, Conditions and Actions:
Step 3: In the Rule Information section, fill in all the information marked with an asterisk, including Rule Name and Description, set the number of Uses per Customer and enable the rule by setting its Status to Active:
Step 4: Scroll the page down to the section called Conditions. You should see the If ALL of these conditions are TRUE statement:
The statement has two bolded links which you need to edit- All and TRUE. Click the ALL link to select either an option ALL or ANY Click on the TRUE link to select an option which is either TRUE or FALSE.
Here is how our final condition is going to look like:
Step 5: Finally, go to the Actions section;
Step 6: Next, insert the Discount Amount with the help of numbers. Choose the appropriate option if you want to discard subsequent rules set up earlier. Finally, click the Save button once the setup process is complete:
|