Purpose
This document is a User Guide for Registration Fields Manager extension for Magento. It describes how work with the extension.
This module provides powerful tools to customize registration form the way you need. Convenient drag-n-drop interface, built-in validation and CSS classes, ability to create as many sections and add new fields as you need.
System Requirements
The extension works under Magento from 1.4.x and higher.
The extension works with Apache 1.3.x and higher, PHP 5, Linux or IIS.
The extension’s correct work is guaranteed with the following browsers:
- IE7, IE8, IE9
- FireFox 4.x, 5.x
- Google Chrome 15.x
- Safari 5.x
The correct work with other Magento versions, other browsers and Apache/PHP versions is not guaranteed.
Installation
All our Magento extensions and templates are installed via IToris Installer.
Download IToris Installer and un-pack to the root of your website. It will then appear in menu System –>IToris extensions –> IToris Installer.
Open it and you will see all our Magento Extensions and Templates, both installed and available. You can install, update and un-install them with one click now.
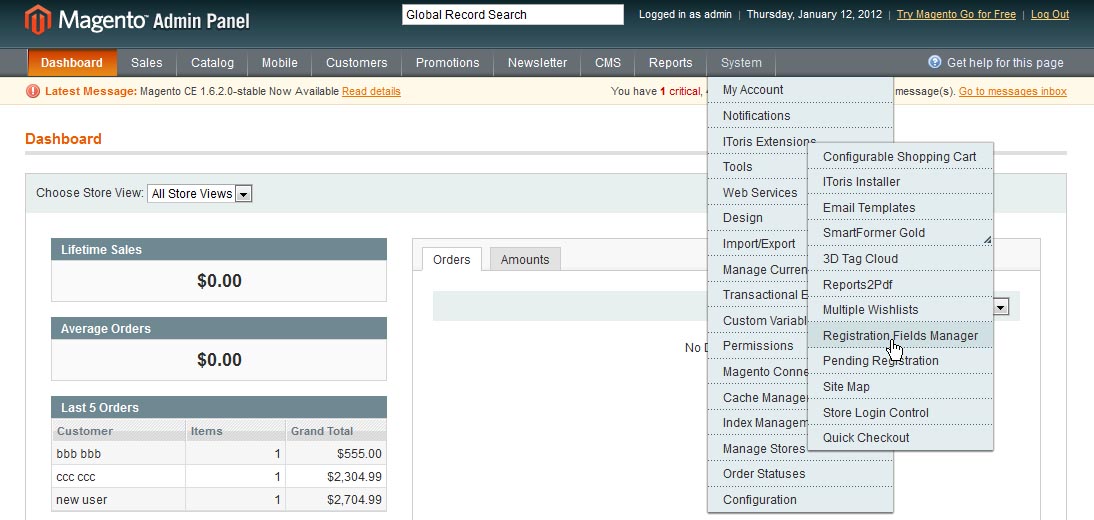
Find Registration Fields Manager in the list of extensions and press Install button. It will ask for the license key that you will receive after the purchase. Enter the key and submit. The extension will be installed. It will be available in menu System –>IToris extensions –> Registration Fields Manager
License
Registration Fields Manager extension is website-dependent. By ‘website’ here we understand the website in Magento terms. Under one Magento installation one license key of the extension can activate all stores/storeviews. within one website. If your configuration has several Magento websites - a separate license will be required for each.
You can switch the license from one domain to another – login to IToris website using the credentials you will receive after the purchase. Go to My Downloads area, find your key there and reset it from the current website. Then use it again to activate another website.
The license also includes free life-time updates for the extension.
Settings
Enable Module
Install Registration Fields Manager and open it in admin area (System –>IToris extensions –> Registration Fields Manager You will see Settings area.
After any changes have been applied, settings need to be saved.
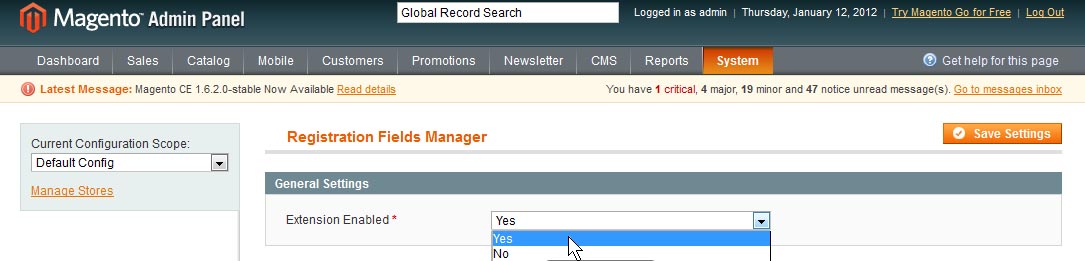
In order to enable the module for the front-end select Extension Enabled = Yes. This will substitute standard Magento registration form with your custom one.
Different Registration Forms for Different Stores
There is ability to create a custom registration form for each Magento store individually. To do it please select a store from the Current Configuration Scope and create a registration form.
Save it. Then select another store and create the form for it (a new, separate one).
As custom registration form pulls the new fields in customers’ profiles, the profile look will depend on which registration form the customer has used. Different custom fields will be pulled in different profiles.
If you want all customers to have the same custom registration form, please leave the default configuration scope.
Languages’ Settings
Different languages can be used for different stores in the module. By defaults the module is provided in English.
To translate it for stores please open app/locale/en_En in your Magento and find Itoris_RegFields.cvs file there.
Copy the file to the locale you need and open the copy for editing.
The file will contain each phrase twice. Translate the second part of each phrase and save the changes.
Creation of Custom Registration Form
Open the module in admin area to customize registration form. You will see Fields Configuration area there where you will customize the form.
After the customization is ready - save the changes by clicking Save Settings button.
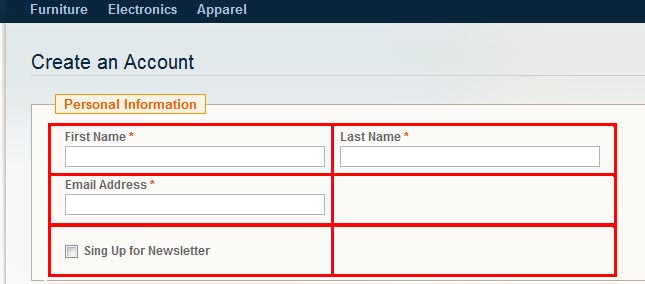
Default Registration Fields
By default you will see standard Magento registration form - 2 sections and 6 fields.
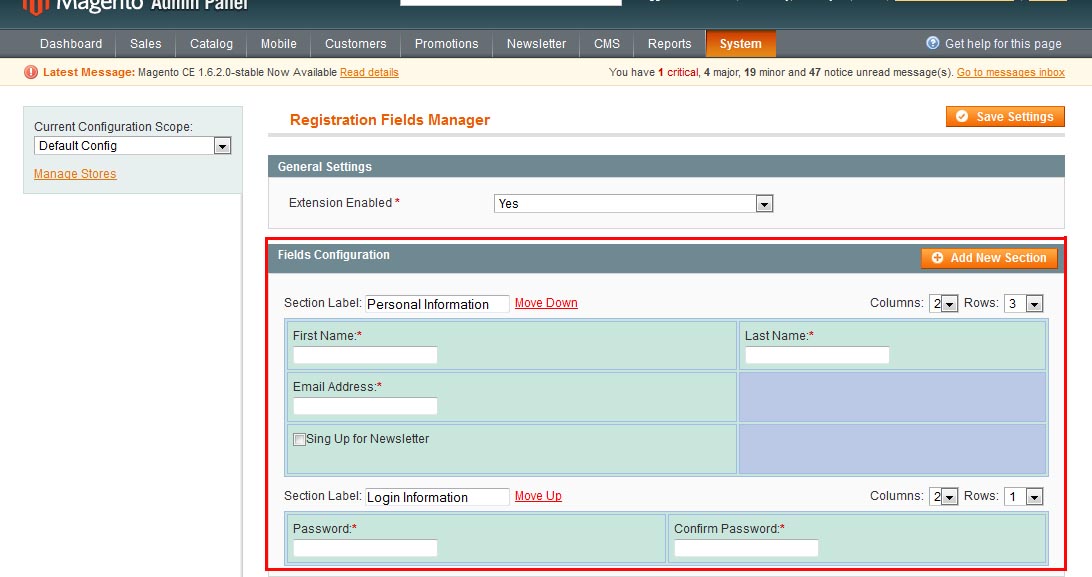
There fields are:
- First Name
- Last Name
- Email Address
- Sign Up for Newsletters
- Password
- Confirm Password
These fields cannot be removed as Magento requires them to create a new account. Yet you can move them to any section you need and re-combine the way you need (please see below).
Overview of the Interface
The area has two default section and six default fields. You can add as many new sections and fields as you need.
Create new Sections
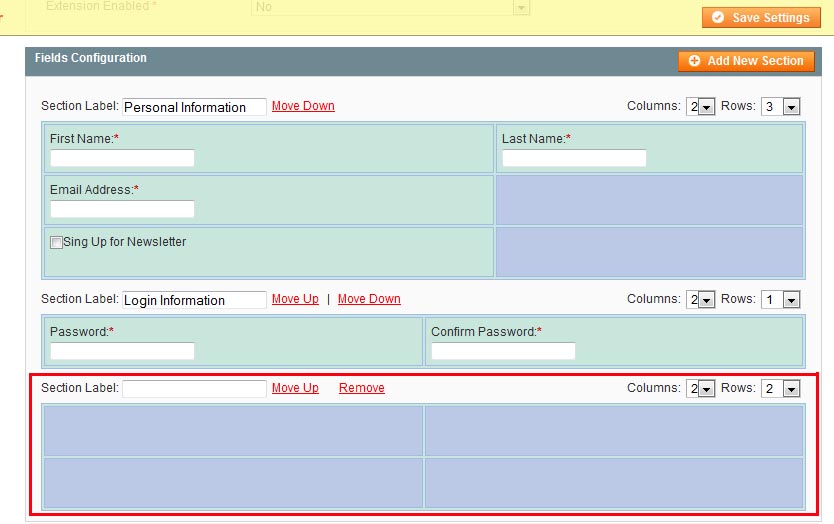
To add a new section press “Add New Section” button. You will see a new section below.
Select the number of rows and columns to be in the section. There can be up to 3 columns and up to 100 rows.
Rows organize ‘lines’ on your form, while columns define how many elements there can be per line. For example default Magento registration form has 2 columns and 3 rows in Personal Information section
Think out the structure of the new section and select the number of rows and columns. Or you can change the number on-the-fly any moment later. Reselect the number and it will be applied immediately.
Below there is an example of a new section with 2 rows and 2 columns:
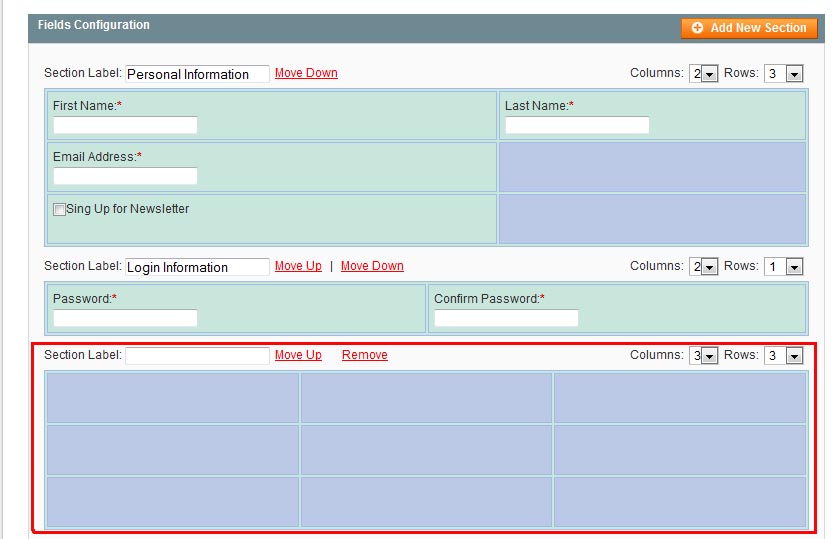
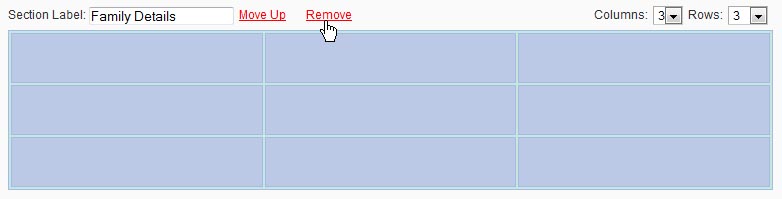
Or with 3 columns and 3 rows:
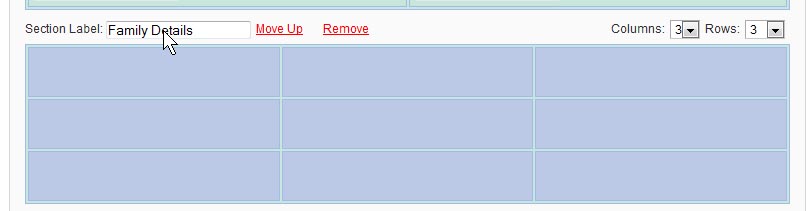
After a section has been added - enter its label. This is the title of the section your customers will see.
Sections can be moved up and down in the registration form. The section will be moved together with all their fields. To move a section use Move Up and Move Down links

The first section will have Move Down link only. The last Section will have Move Up link only. The mediate sections will have both links available.
You can remove any custom section by clicking Remove link. You will see a confirmation pop-up ‘Do you really want to remove this section?’ If you agree - the section will be removed.
Yet 2 default Magento sections can be removed only after you have moved all default fields to other sections. As soon as they are emptied - there appears ability to remove them.
Create Custom Fields
The core functionality of the extension - ability to add new custom fields to the registration form. You can add fields to any empty cell in any section.
To add a new field put your mouse over the cell. You will see a special icon appearing:
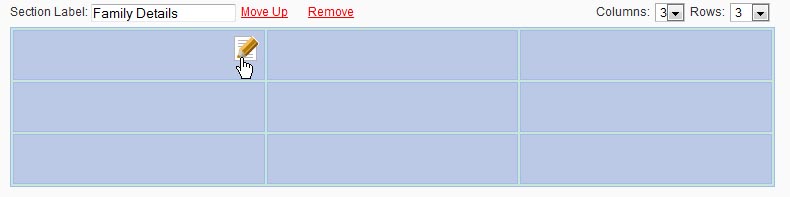
Click the icon. You will see a box with Field’s Configuration:
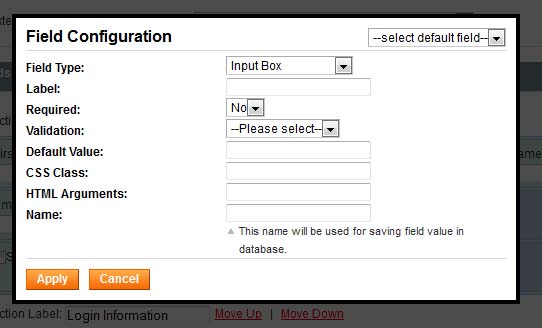
Here you can select the field’s type and enter its properties. Depending on the type of the element the properties may vary. The following types are available:
Custom Fields
Input Box
The most popular element. It creates a new input, where customers will populate such information as name, email, phone number, etc.
If you need to add an input box, select the type and then select the properties you need:
There fields are:
- Label - the title of the field that your customers will see
- Required - select yes or no
- Validation - this is a checking of what can be entered in the input box. This is the error message you see when you have populated something incorrectly in a form.
- Email
- Name
- Number
- Money
- Phone
The following validations are available:
- Default Value - a default text your customers will see in the field. For example Phone fields may have ‘please use XXX-XXX-XXXX format’ default value text.
- CSS Class, HTML Argument - please see below. These settings are for advanced use.
- Name - it is very important to add the field’s name. This name allows to save the field in the DB.
Please use only English letters, digits and underlining for the name. Your customers will not see it.
For example Correct name: phone_number
Incorrect name: phone number
Below there are 2 buttons. Apply button adds the field to the form. Cancel button closes the window without adding the field.
Custom Fields
Password Box
This box allows your customers to enter any private data with high security level. The same as with password, this box will display °°°°°°°°°°°° symbols when data is entered.
It is a good idea to use this field when you need to collect SIN, credit card, etc.
This field’s properties are similar to Input box:
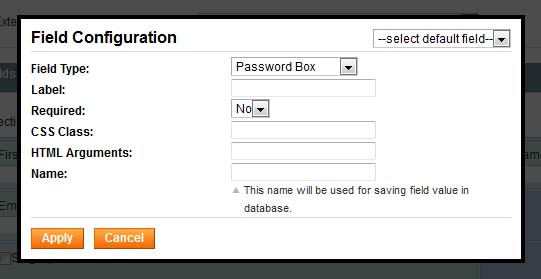
There fields are:
- Label - the title of the field that your customers will see
- Required - select yes or no
- CSS Class, HTML Argument - please see below. These settings are for advanced use.
- Name - it is very important to add the field’s name. This name allows to save the field in the DB.
Please use only English letters, digits and underlining for the name. Your customers will not see it.
For example Correct name: phone_number
Incorrect name: phone number
Below there are 2 buttons. Apply button adds the field to the form. Cancel button closes the window without adding the field.
Custom Fields
Password Box
This box allows your customers to enter any private data with high security level. The same as with password, this box will display °°°°°°°°°°°° symbols when data is entered.
It is a good idea to use this field when you need to collect SIN, credit card, etc.
This field’s properties are similar to Input box:
There fields are:
- Label - the title of the field that your customers will see
- Required - select yes or no
- CSS Class, HTML Argument - please see below. These settings are for advanced use.
- Name - it is very important to add the field’s name. This name allows to save the field in the DB.
Please use only English letters, digits and underlining for the name. Your customers will not see it.
For example Correct name: phone_number
Incorrect name: phone number
Below there are 2 buttons. Apply button adds the field to the form. Cancel button closes the window without adding the field.
Custom Fields
Radio(s)
This element adds one or more radiobuttons to your custom form. The following settings will be available:
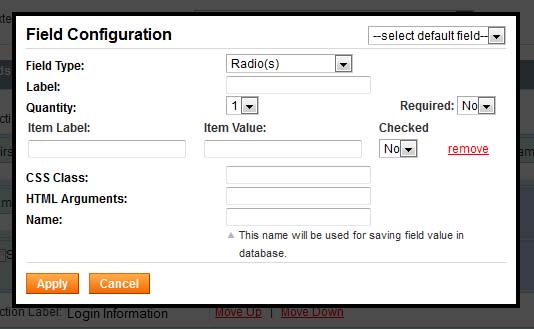
There fields are:
- Label - the title of the field that your customers will see
- Quantity - how many radio buttons to be added.
- Required - if the group of radio buttons required (one should be selected) or not
- Item Label (will be available for each radio button separately if you select more than one) - the text, title of the radio button your customers will see
- Item Value (will be available for each radio button separately if you select more than one) - enter the values of radio buttons, e.g. 1, 2, 3 - etc.
- Checked (will be available for each radio button separately if you select more than one) - should your customers see the radio button checked when they open the form or not
- Remove, move up/down - there are arrows to move radio buttons up and down in the group. You can also remove a radio button from the group by clicking the link near it
- CSS Class, HTML Argument - please see below. These settings are for advanced use.
- Name - it is very important to add the field’s name. This name allows to save the field in the DB.
Please use only English letters, digits and underlining for the name. Your customers will not see it.
For example Correct name: phone_number
Incorrect name: phone number
Below there are 2 buttons. Apply button adds the field to the form. Cancel button closes the window without adding the field.
Custom Fields
Select Box
This element adds a drop-down (select) to your form. The following properties are available:
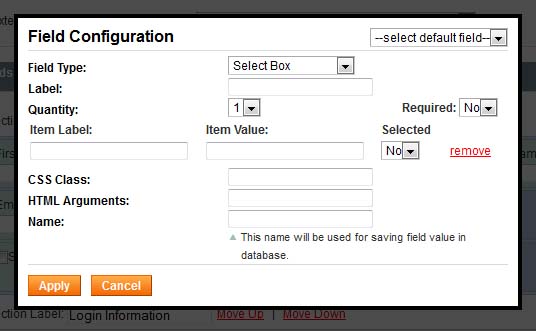
There fields are:
- Label - the title of the field that your customers will see
- Quantity - how many drop-down options to be added.
- Required - if the drop-down required (one option should be selected) or not
- Item Label (will be available for each drop-down option separately if you select more than one) - the name of the option your customers will see
- Item Value (will be available for each drop-down option separately if you select more than one) - enter the values of options, e.g. 1, 2, 3 - etc.
- Selected (will be available for each drop-down option separately if you select more than one, can be applied to one option only) - the option your customers will see by default in the drop down.
For example if you have a list of countries and your customers are mostly from Canada, you can select ‘Canada’ option to be displayed by default.
- Remove, move up/down - there are arrows to move options up and down in the list. You can also remove an option from the list by clicking the link near it
- CSS Class, HTML Argument - please see below. These settings are for advanced use.
- Name - it is very important to add the field’s name. This name allows to save the field in the DB.
Please use only English letters, digits and underlining for the name. Your customers will not see it.
For example Correct name: phone_number
Incorrect name: phone number
Below there are 2 buttons. Apply button adds the field to the form. Cancel button closes the window without adding the field.
Custom Fields
List Box
This element adds a list box to your form. It is similar to drop down, only several options are displayed simultaneously.
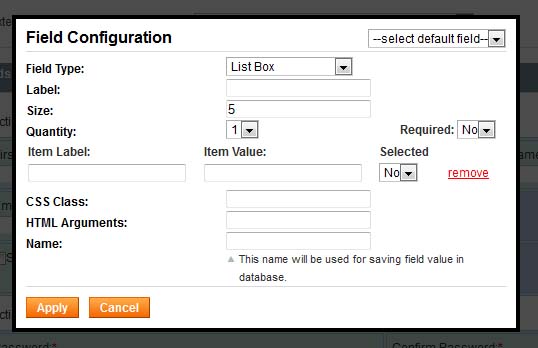
There fields are:
- Label - the title of the field that your customers will see
- Size - how many options will be visible immediately. There can be 10 options totally, yet only 5 visible immediately, and to see the rest users need to scroll.
- Quantity - how many list options to be added.
- Required - if the list box required (one option should be selected) or not
- Item Label (will be available for each option separately if you select more than one) - the name of the option your customers will see
- Item Value (will be available for each option separately if you select more than one) - enter the values of options, e.g. 1, 2, 3 - etc.
- Remove, move up/down - there are arrows to move options up and down in the list. You can also remove an option from the list by clicking the link near it
- CSS Class, HTML Argument - please see below. These settings are for advanced use.
- Name - it is very important to add the field’s name. This name allows to save the field in the DB.
Please use only English letters, digits and underlining for the name. Your customers will not see it.
For example Correct name: phone_number
Incorrect name: phone number
Below there are 2 buttons. Apply button adds the field to the form. Cancel button closes the window without adding the field.
Custom Fields
Multi-select List Box
This element adds a drop-down (select) to your form. Several options can be selected in it. The following properties are available:
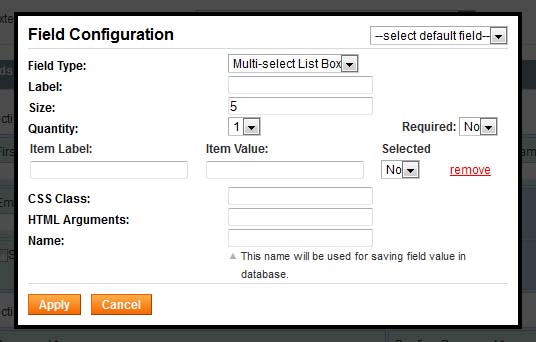
There fields are:
- Label - the title of the field that your customers will see
- Size - how many options will be visible immediately. There can be 10 options totally, yet only 5 visible immediately, and to see the rest users need to scroll.
- Quantity - how many list options to be added.
- Required - if the select box required (one option should be selected at least) or not
- Item Label (will be available for each option separately if you select more than one) - the name of the option your customers will see
- Item Value (will be available for each option separately if you select more than one) - enter the values of options, e.g. 1, 2, 3 - etc.
- Selected (will be available for each option separately if you select more than one) - the option your customers will see by default in the drop down.
For example if you have a list of countries and your customers are mostly from Canada, you can select ‘Canada’ option to be displayed by default.
- Remove, move up/down - there are arrows to move options up and down in the list. You can also remove an option from the list by clicking the link near it
- CSS Class, HTML Argument - please see below. These settings are for advanced use.
- Name - it is very important to add the field’s name. This name allows to save the field in the DB.
Please use only English letters, digits and underlining for the name. Your customers will not see it.
For example Correct name: phone_number
Incorrect name: phone number
Below there are 2 buttons. Apply button adds the field to the form. Cancel button closes the window without adding the field.
Custom Fields
Textarea
This element adds a text area to your form - for larger pieces of text, where input box is not convenient. The following properties are available:
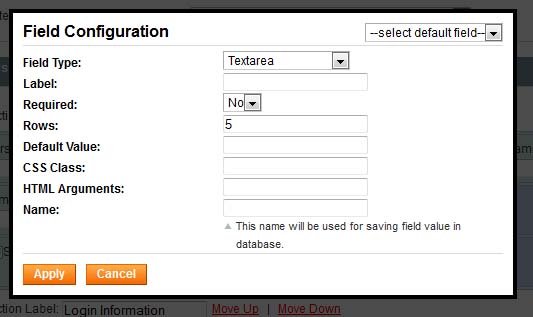
There fields are:
- Label - the title of the field that your customers will see
- Required - select yes or no
- Rows - how many rows to be displayed. It does not mean that there will be visible rows - it is just the size of the area.
- Default Value - a default text your customers will see in the field. For example Phone fields may have ‘please use XXX-XXX-XXXX format’ default value text.
- CSS Class, HTML Argument - please see below. These settings are for advanced use.
- Name - it is very important to add the field’s name. This name allows to save the field in the DB.
Please use only English letters, digits and underlining for the name. Your customers will not see it.
For example Correct name: phone_number
Incorrect name: phone number
Below there are 2 buttons. Apply button adds the field to the form. Cancel button closes the window without adding the field.
Custom Fields
File Upload
This element allows customers to upload files during the registration. The following properties are available:
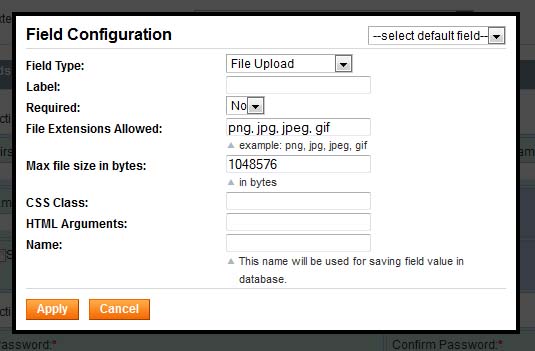
There fields are:
- Label - the title of the field that your customers will see
- Required - select yes or no
- File Extensions Allowed - which files’ types are allowed for uploading. Enter all extensions you need separated by commas.
The following validations are available:
- Max file size in bytes - the maximal size of the file allowed for uploading. If the size exceeds, there will be an error displayed for the customers.
- CSS Class, HTML Argument - please see below. These settings are for advanced use.
- Name - it is very important to add the field’s name. This name allows to save the field in the DB.
Please use only English letters, digits and underlining for the name. Your customers will not see it.
For example Correct name: phone_number
Incorrect name: phone number
Below there are 2 buttons. Apply button adds the field to the form. Cancel button closes the window without adding the field.
Static Text
This element allows to add text instructions and clarifications to the form. The following properties are allowed:
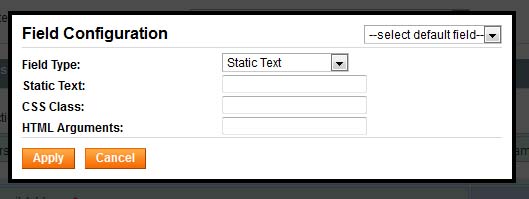
- Static Text - enter the text here
- CSS Class, HTML Argument - please see below. These settings are for advanced use
Below there are 2 buttons. Apply button adds the field to the form. Cancel button closes the window without adding the field.
CAPTCHA
This is a special element for additional protection of your form. Magento registration form does not contain any CAPTCHA, it also allows immediate login after the registration. This may lead to the efforts to hack your website.
This element adds text that is readable by humans, but not by computers. Your customers will need to enter the text they see to confirm they are not bots.
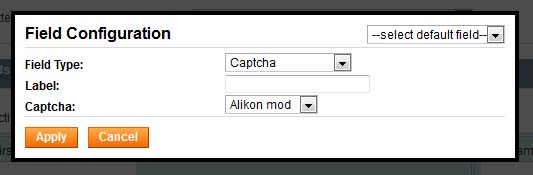
- Label - what your customers will see, the name of the field
- Captcha - there are 3 styles of captcha images available. Select the one you prefer.
Below there are 2 buttons. Apply button adds the field to the form. Cancel button closes the window without adding the field.
Manage Custom Fields
You can manage both default and custom fields of your form. First of all, you can change the location of the fields. To move a field to another place of section, click it and holding the mouse’s button pressed drag it to a new location. Drop it there.
On this image mouse is over the field
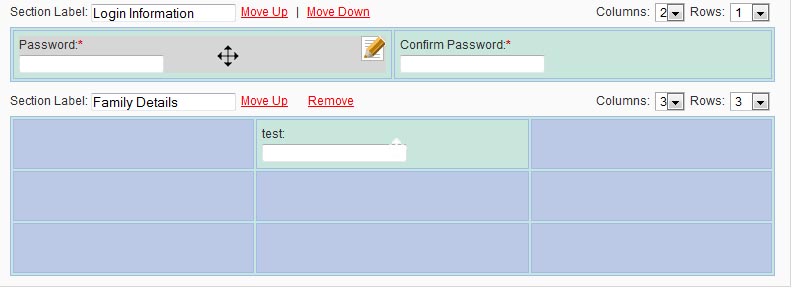
On this image the field is dragged to another section
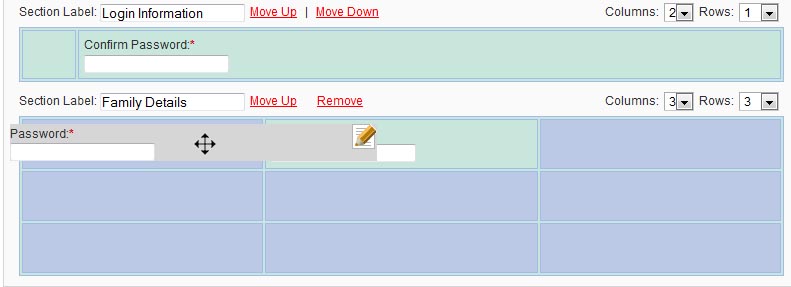
On this image the field has been dropped, and it has adjusted to the new place.
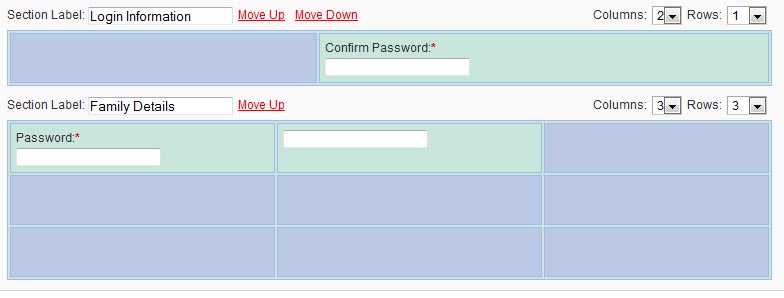
This way you can easily restructure your form - change the places of elements in seconds. You can change the place for standard default Magento fields as well.
If you need to edit or remove an element - put your mouse over it and click the special editing button:

You will see the same properties as with creating the element. Also a new button will be available - Remove. It removes the element from the form.
Pull Magento Account Fields to Registration Form
There is a number of fields in customers’ account that are available for logged in customers only - telephone, address, date of birth, Tax/Vat number, etc.
Registration Fields Manager module allows to pull these fields in the registration form. When customers populate the fields, they will be populated in the profile as well.
To add these standard fields to registration form please add a new field and make selection from the top right drop down in the field’s properties:
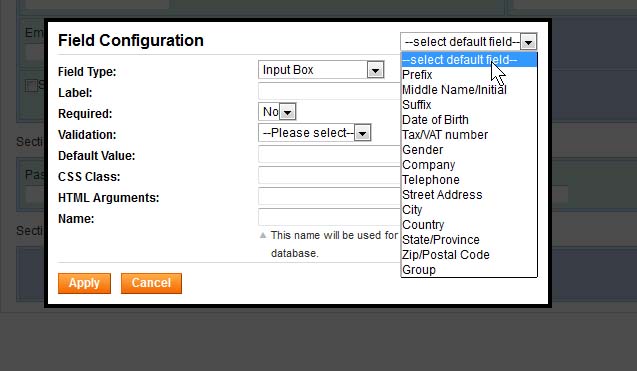
Select the field you want to add, and its properties will be populated automatically.
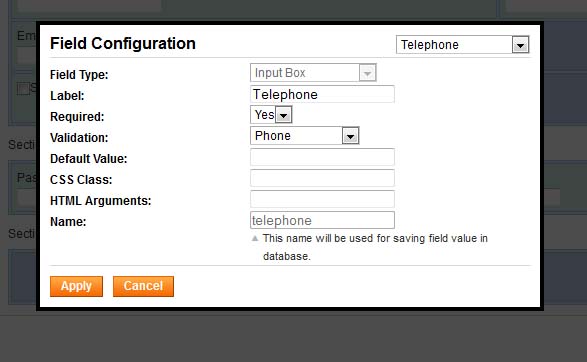
You can edit the label, yet there is no ability to edit the name, so that this field is associated correctly with Telephone field from the customers’ accounts.
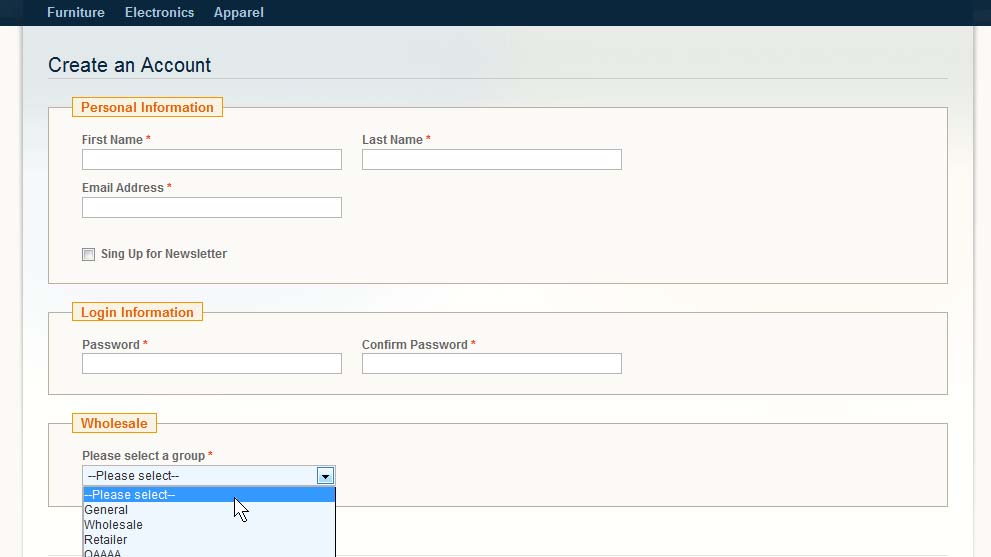
Customer Groups
You can provide ability for customers to select customer groups during the registration.
To do it please add a new field to your form. In its properties select Group from -select default fields- drop down.
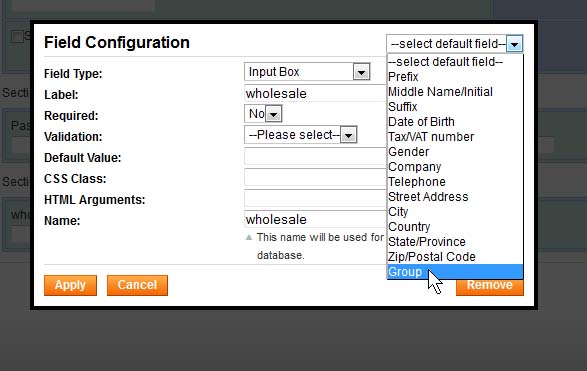
N.B. Magento customer groups need to be created in advance.
The field will add ability to select a group on registration form.
Email Notifications
As standard Magento email notifications contain only standard registration fields, you will most probably need to edit them.
To insert your custom registration fields into the emails, please use {{var customer.field_name}} variable, where field_name is the name you have used.
Front-end
From the front-end, your custom registration form will substitute standard Magento’s one. It will be available following the same links.
The look and style of the form will depend on your template. Below there is a sample of a custom registration form on standard Magento template:
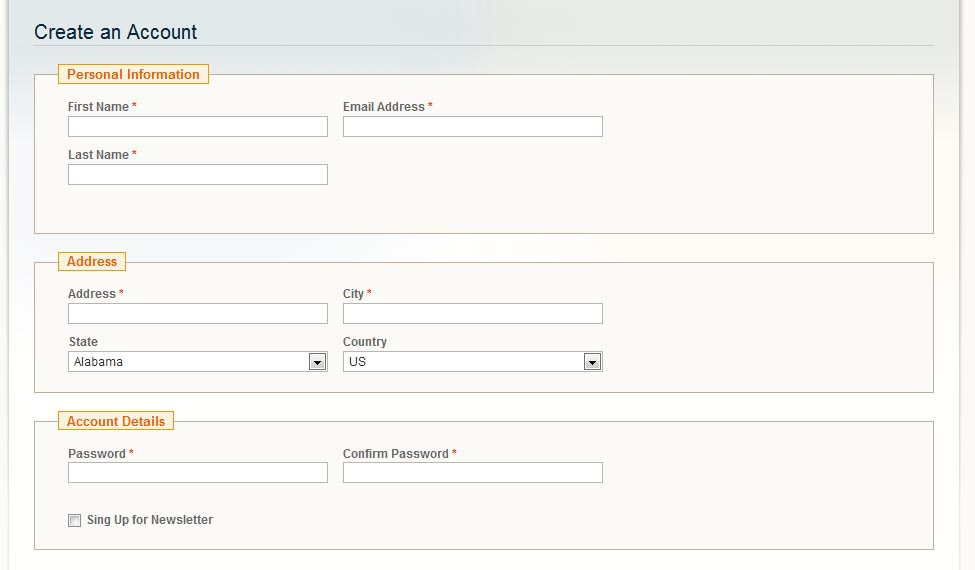
As you can see, there is a new custom section added - Address. Account information is moved lower.
Advanced Usage
The majority of elements on the form have two attributes for advanced usage:
CSS class - the data entered in this attribute will be added to class="{{css_class}}" attribute of the element.
HTML argument - the data enetre in this attribute will be added to HTML of the element <input type="text" name="abc" {{html_arguments}} />
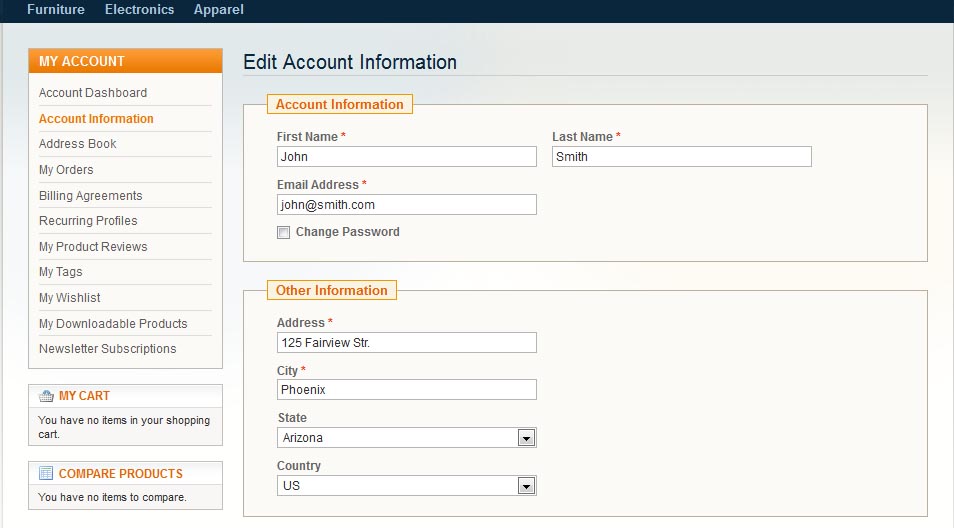
Customers’ Accounts
The module adds all created custom registration fields to customers’ accounts. So the customers will see both Magento standard and custom fields.
The data will be available in Account Information tab. There will be 2 areas - Account Information where standard registration fields are displayed, and Other Information, where all custom fields are displayed:
The information is editable in a usual Magento way. If the registration information has been edited from the profile - it will override the previous information.
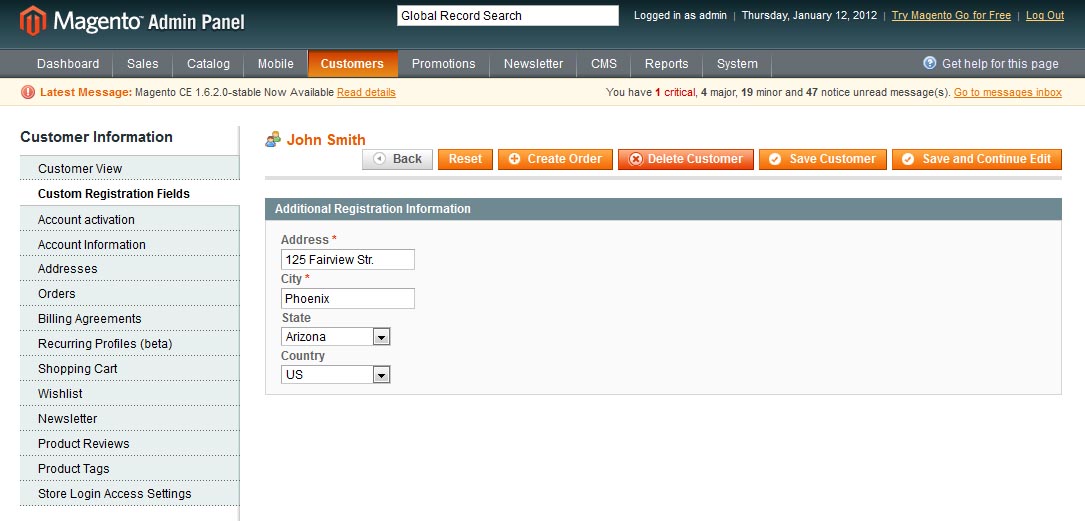
Administrators from the back-end will also see both standard and custom registration fields. Administrators need to select Customers -> Manage Customers and choose a customer from the list.
Standard registration information will be available in a usual way. All custom data will be kept in Custom Registration Fields tab.